Accessibility Evaluation of Gemini HF-1K

Accessibility evaluation of the Linear Amp UK Gemini HF-1K

By Kelvin Marsh M0AID

September 2019

Background

The Linear Amp UK brand is well known in the UK, and reading their history on http://www.linearamp.co.uk reveals they have quite a heritage.

I was having ALC compatibility issues between my previous amplifier and radio, and was actively looking at replacement options. The solid state Gemini HF-1K seemed to tick all the boxes, but as a blind operator I initially had concerns that the amplifier was controlled with a non-accessible touch screen.

New Amplifier Requirements

The primary requirement for my new amplifier was to easily switch between Standby and Run mode. It is necessary to make certain checks and adjustments with low power, and it is best to set the amp to Standby when these are done. I did not want to be poking around a touch screen that gave me no aural feedback when performing such a frequent task.

Having previously used a switch in the PTT line with other amplifiers, I knew there was likely to be an easy way of stopping the amplifier from transmitting. reading the manual, I saw that the HF-1K could be started in Run Mode, and thus having a physical switch to effectively put the amplifier into Standby seemed an ideal solution to toggle between the modes.

A huge plus point for the blind operator is that the HF-1K senses the operating frequency, and has automatic band changing. No need to manually turn knobs, or have electronic interfaces between amplifier and radio.

High on my wish list was the need to have some proper confirmation that the correct band and antenna had been selected. In the past I’ve used an Icom IC-PW1, and this time I wanted more feedback than just listening for relay clicks and other noises. Some kind of voice guidance was desirable.

My final concern was about error handling. The manual explained how the HF-1K handles error trips, and how the resulting messages need to be cleared using the touch screen. The amplifier enters a protection mode when errors are caught, and the operator cannot continue without taking action. In practice my amplifier has never tripped while in normal operation, but it seemed sensible to make sure I could clear messages without using the touch screen.

To summarise my concerns, I didn’t want to be prevented from using the amplifier because there was no way to perform a simple but mandatory step.

Speech Support

Before buying the Gemini, I read the Eham reviews, and saw that Simon G4ELI had written the remote software for the amplifier. After speaking to Roger GW4WND, who builds the HF-1K, and having an offer from Simon G4ELI to add Speech Support to his software, I felt confident to place an order.

The amplifier took about 2 weeks to arrive, and Simon G4ELI sent me the first version of the Speech Support software on the same day. Fantastic!

Gemini HF-1K Front Panel

The Gemini HF-1K Amplifier front panel

Gemini HF-1K touch screen

Close up of the front panel touch screen, simple, logical and concise

Audio Demonstration

I’ve now had the Gemini HF-1K for a couple of months and I am delighted with it. You can hear my audio review and demonstration by clicking the following link:

Gemini HF-1K MP3 Audio Demonstration

Full Speech Command List

===============
Ctrl+’A’ Select antenna A
Ctrl+’B’ Select antenna B
Ctrl+’C’ Select antenna C
Ctrl+’D’ Clear trip
Ctrl+’1′ Select band 1.8 MHz
Ctrl+’2′ Select band 3.5 MHz
Ctrl+’3′ Select band 5 MHz
Ctrl+’4′ Select band 7 MHz
Ctrl+’5′ Select band 10 MHz
Ctrl+’6′ Select band 14 MHz
Ctrl+’7′ Select band 18 MHz
Ctrl+’8′ Select band 21 MHz
Ctrl+’9′ Select band 24 MHz
Ctrl+’0′ Select band 28 MHz
Ctrl+’X’ Select band 50 MHz
Ctrl+’O’ Toggle speech support
Ctrl+’P’ Report peak power
Ctrl+’S’ Report status
Ctrl+’W’ Report SWR
Ctrl+’T’ Report temperature
Alt+’R’ Switch mode to Run
Alt+’S’ Switch mode to Standby

Kenwood TH-D74 MCP JAWS Scripts

Joe VK5JKS has written JAWS scripts for the TH-D74 MCP program. JAWS is a popular PC screen reader used by many blind amateurs. The JAWS scripts improve the accessibility and usability of the Memory Control program for voice and Braille output. The script file, including instructions, can be downloaded from the following link:

TH-D74 MCP-D74 JAWS scripts.zip by Joe VK5JKS

or the Related Downloads section of the Kenwood TH-D74 page on the Active Elements site.

The script installation instructions are as follows:

Kenwood MCP-D74 Memory Control Program scripts for JAWS for Windows 18 and 2018

Install the contents of this zip file into your JAWS User Settings folder.
TO find this folder on your system:
* Press Windows key.
* Type Utilities.
* Choose Utilities JAWS 2018 (or 18) from the search results.
* Choose Explore My Settings.
* Copy the contents of this folder into the folder which opens.

The path of this folder is typically something like:
C:\Users\YourName\AppData\Roaming\Freedom Scientific\JAWS\2018\Settings\enu

Start the MCP-D74 program.
Use JAWSKey+f1 for screen sensitive help in the application.

Please note that comboboxes in this program are only accessible if expanded. this means that once focus lands on a combobox, you must use alt+down arrow to expand it, and then press Enter once you’ve made your selection.

To report a bug, please write to Joseph Stephen VK5JKS
Joe’s contact details are included in the script documentation

Go4lo Accessibility and Construction Review

Go4lo Audible SWR and Power meter Building and Accessibility Review

By Kelvin Marsh M0AID and Neil Robertson G0ORG

April 2017

Background

IT is a fairly good bet that a radio amateur will, at some stage, want to know if their

antenna is a good match for a given frequency. You could just rely on the internal ATU to make sure the radio sees a 50 ohm match, but the time will come when this is not enough. Therefore, an SWR meter will become an essential item to have in the amateur’s toolbox .

Photo showing the finished boxed unit with foam packing added to keep the battery from moving

The finished boxed unit with foam packing added to keep the battery from moving

A sighted amateur may have several SWR meters, either inserted into the feedline to the antenna, or built into the radio itself. Whilst some modern radios will verbally announce the SWR reading to a blind operator, many will not, and so an external meter giving audio feedback is needed.

There have been some reasonably priced ‘accessible’ meters produced over the years, (See the evaluation of the LDG TW-1 Talking SWR/Power meter), but these have been discontinued. There are also units such as the Power Master 2 from Array Solutions that will read SWR and power when combined with a HamPod, (See the Power Master 2 review), and whilst a terrific solution, it is an expensive option and will set you back the equivalent price of a small amateur transceiver.

My interest was therefore peaked by the Go4lo SWR/power meter from SOTABEAMS. The Go4lo is supplied as a kit and plays audio tones to indicate SWR. LEDs also show power ranges below 5 watts, 5 to 25 watts and from 25 to 100 watts.

SOTABEAMS offer the name of an amateur willing to assemble and calibrate the meter, for anyone unable to do it themselves or find a friend with the necessary skills.

Neil G0ORG offered to assemble and calibrate a Go4lo for evaluation by Active Elements, and describes his experiences building the kit, below.

The kit

Photo showing the many components

The many components

The kit arrived in a Jiffy bag and was well packed. The version of the kit PCB was 2.0 and marked May16. No instructions were supplied with the kit, however a full printable guide was available from the SotaBeam website. The optional hardware pack was well protected and well thought out. A small packet of sweets were included from SotaBeams proprietor Richard Newstead G3CWI, which was a nice touch.

Photo showing the kit parts and enclosure

The kit parts and the enclosure

The size of the finished meter is 110mm wide x 80wide x 40mm deep. It weighs approximately 190 grams when fitted with a 9 volt battery. The box is black and has a transparent lid, the PCB mounted LEDs are viewable through it, the only protrusions are the two BNC sockets and one momentary push switch. The transparent lid is etched with the labelling of the LEDs, the sockets, switch and other details.

Building and testing

The kit was relatively easy to construct and alignment was simple, just requiring an accurate volt meter and a good quality 50 ohm dummy load with a 5 watt transmitter. A small potentiometer is adjusted for correct voltage at two test points, the accuracy of this set up determines the overall later performance. The volt meter needs to have good resolution as the tolerance when aligning is plus or minus 0.05 of a volt. All components are conventional with no surface mount. The Microprocessor is a pre-programmed Pic device.

Go4lo The fully assembled PCB

Photo showing the fully assembled PCB

The PCB is unusually thin, approximately 1 mm, but is of good layout and well annotated. Some of the ¼ watt resistors where a little tight to fit as the resistor component hole spacing is minimal. I had to be careful not to stress them when fitting them. From a previous career spent in the Electronics industry I have experience of fractures that can be caused to components if leads are bent to close to the component body, to make sure I did not do this I formed the leads using needle nose pliers to allow a slight return on the leads.

The fiddly bits are the Toroid transformers and the sampling coax assemblies that pass through them. These form the basis of the SWR Bridge, one for forward and one for reflected power sampling. Each toroid has a specified number of turns and the coaxial cable has to be carefully prepared as per the drawings. Once assembled I opted to hold each of the transformers in place with a blob of hot melt glue.  One component to be careful with when soldering is a voltage converter marked as U1. The legs of this device are very close together and the solder pads are very, very close together.

Photo showing the LEDs during Testing

The LEDs lit during Testing

The PCB mounts on the lid and the PP3 battery is inside the unit, it has a typical battery snap connector lead which is directly soldered into the PCB. Careful removal of the battery when changing it is needed otherwise over time the soldered wires may break at the solder joint.

It may have been better for SotaBeams to have supplied a Molex type two pin connector and header to help with durability here when changing the battery. Care is needed to do so and is quite fiddly.

The battery is located between the PCB and the end of the enclosure to this end the battery has space to rattle around (and jiggle the connector wires). As the device is also intended to be used portable I think a small piece of foam between the top panel and the battery side is a worthwhile addition.

Observations and further ideas

For those with sight difficulties the recommendation would be to get help changing the battery although for permanent use I don’t see why a 9v regulated mains adaptor cannot be used. There is enough space to add a power connector to the enclosure if required.
If the PCB were added to a different hardware box then coaxial leads could be used to connect to SO239 connectors, if required.

There is scope to add a further sound modification if required in place of the 3 power LEDs for the sight impaired, this could be a further tone to indicate some approximation of power level however the levels would remain an approximation as the power resolution between each LED is quite large.

For those who want to measure power exceeding the 110w level (400w for example) there is scope to make a new SWR sampling head and modify to the PCB. The only restriction is that careful modification will need to be made to handle the plus or minus voltage within the maximum voltage tolerances required to create the comparison error measurement. As it is a microprocessor circuit then it would probably be prudent to shield the PCB from the SWR sampling head and use feedthroughs for the voltage measurement connections at these power levels.

Conclusions regarding building and testing the kit

The kit does require a level of skill to construct, especially the transformers and sampling coaxial cable. Some solder joints are close together so good soldering techniques are required. If in doubt I recommend the use of a test meter to check for any solder bridging.

Audio Demonstration

You can hear an audio demonstration of the Go4lo in action here.

Click here for Go4lo MP3 audio demonstration

Overall Conclusions

I think Richard Newstead from SotaBeams has provided a great little item here that has visual impaired accessibility built in, possibly without realising it.

Although aimed at the portable market for SOTA it is ideal for visually impaired Amateurs as the sound is the most important element in this instance. The kit is priced correctly and has been well thought out. All items are of good quality and it was a pleasure to construct. As the clever bit is the Microprocessor there is scope to modify it if needed for further ease of use by visually impaired Amateurs.

The device is useful to any Radio Amateur, during testing I appreciated how quick it was to find a drop in SWR when using an antenna tuner. The unit is very accurate and overall a pleasure to use.

Further notes on usage

Holding the oblong box with the BNCs at the top, the left one is Transmitter and the right is the Antenna.  Just below the two BNC in the middle of the box is a power switch, the unit powers on with a dit dah and powers off automatically with a dah dit a few seconds after no use or if it has not seen any RF.

The power up time can be short if the transmitter is not activated but if it goes off a simple button press puts it back on again.  On power up the red SWR LED blinks then goes off, nothing else is displayed. When power is applied the appropriate power LED, green for 0.25 to 5 watts, orange for 5 to 25 watts or red for 25 to 110 watts light. The red SWR LED flashes in line with the beeps of the measured SWR. Sotabeams claim that the pp3 9v battery will last over a year as in standby it only draws a few micro amperes.

From Sotabeams product information:

Our latest product is something that I have wanted to develop for a long time: it’s an audible SWR-Power Meter. Unlike conventional SWR meters, the Go4Lo indicates SWR by sound. Basically the worse the SWR, the faster it bleeps.

This type of user-feedback makes it much easier to adjust antennas than using conventional SWR meters. If you want to know actual SWR, it is just half the number of bleeps per second (e.g. six bleeps per second = an SWR of 6/2=3:1). To make tuning even easier, the tone of the bleeps reduces below an SWR of 2:1 too giving additional feedback: this SWR meter really lives up to its “Go4Lo” name.

In addition to the audible feedback, we built in two types of visual feedback. Firstly the SWR is indicated by a flashing LED which flashes at the same interval as the SWR bleeps. But that’s not all as we incorporated a three-stage power meter showing 0.25-5 Watts, 5-25 Watts and 25-100 Watts. The transition at 5 Watts is especially useful for QRP operators as it makes setting your power level accurately to 5 Watts, simple.

Power Master 2 and HamPod Accessibility Review


Power Master 2 watt meter and HamPod Accessibility Review

By Kelvin Marsh M0AID December 2016Photo of PM2 front panel

Background Photo of Hampod

I have been using the Power Master 2 watt meter (PM2), from Array Solutions, and a HamPod, from Rob K6DQ, for a couple of years. The PM2 and HamPod combine to give a blind operator a talking Power and SWR meter.

Initially, the purchase could be seen as an indulgence, particularly as I also own the LDG TW-1 talking watt meter, but I had a particular requirement, as I wanted to automatically and instantly stop the amplifier from transmitting if there was a mismatch or high VSWR in the system.

The PM2 meets this safety requirement, by being inserted into the electrical PTT loop to the amplifier. If the loop is broken, the amplifier is prevented from transmitting. I have several items in the loop and if any one of them is adjusting or has a problem, the electrical circuit is broken. My PTT loop includes the PM2, the amplifier, the auto ATU and the SteppIR antenna. When a predefined power or SWR value Is exceeded, the PM2 issues an alarm and the loop immediately goes ‘open circuit’.

As I use a SteppIR antenna, the elements automatically adjust to the correct length, and there is normally no need for an ATU. I wanted to be able to switch from band to band, have the antenna adjust, the amplifier automatically switch to the correct band and then be able to transmit without further thought. The PM2 gives me the confidence to do this. I know that if I’ve made a mistake or there is a mismatch or technical issue, the alarm will sound and the amplifier will be by-passed.

Operating

Of course, as well as the safety features of the alarms, the PM2 also gives you accurate readings for Forward and Reflected power and SWR. It is also highly configurable. In practise, I find I am using the PM2 continuously while I am operating. It is a real pleasure to have accurate measurements available, and as the RF power output from the amplifier will vary slightly from band to band, it is great to be able to make sure I’m transmitting up to the power limit, but not over it.

The PM2 is not accessible to a blind operator without the addition of the HamPod. This accessibility evaluation is therefore about how the HamPod interacts with the PM2 and how the visual alarms and configuration are converted to aural tones and speech output.

Visual Description

Chris M5AGG adds further description here and some additional detail of what he sees on the display, from the perspective of a sighted user:

“The pm2 display indicates swr and power simultaneously. Power is displayed by a fast moving bar graph and numerical displays above this show power and swr.

The bar graph is ideal for tuning as peaks in power can be easily followed. The coupler can be sited remotely from the meter connected via a screened audio jack lead. Photo of PM2 coupler

Two couplers can be used with the meter ranging from 3 to 10KW maximum power. Each is supplied with calibration offsets which when set up in the meter menu ensure accurate results. Despite the high 3KW of the lower power coupler, the meter senses maximum power in use, to ensure the bar graph always displays a high resolution, with many segments illuminated whether the power is 50 watts or 3kw.

Also on the front panel are two leds that light up when swr or power exceed preset settings.

The alarms can also break the ptt line to avoid any damage that may occur. Settings can be adjusted via the menu button on the front panel.
The owner’s callsign can also be displayed too, but as soon as RF flows this is replaced by the bar graph.”

Audio Demonstration

Writing this review, it seemed like a very good idea to reread the documentation for the PM2 and HamPod, and the first thing that struck me was the joy of having the HamPod manual in text format! Quite refreshing not to have to convert documentation, so it can be read by a PC screen reader.

I’ve recorded a series of short demonstrations, looking at different aspects of the PM2 and HamPod, and you can download the zipped MP3 files here:

PM2 and HamPod audio Demonstration

The MP3 tracks are:

1 General Description 3:04
2 Basic Operation 8:24
3 Audio Tuning Mode 8:16
4 PM2 Configuration 13:25
5 HamPod Configuration 7:34

Conclusions

The Power Master 2 is a useful addition to the shack, and highly desirable for anyone running high RF power from an amplifier. When combined with the HamPod it becomes very accessible for a blind user, and Rob K6DQ has again done an amazing job in making the meter ‘talk’. I know that Array Solutions were very helpful in tweaking their firmware, so Rob could have full compatibility between the devices. The result is superb! I would encourage you to listen to the audio demonstration to learn if the PM2 and HamPod combo will meet your requirements, and if it does, you have the knowledge that it can be fully used by a blind amateur.

Kenwood TH-D74 Accessibility Review

Accessibility Review of the Kenwood TH-D74

Close up photo of the th-d74 Rig

By Kelvin Marsh M0AID

December 2016

Background

I was contacted by Jim MI0JPC in September 2016, asking if I had any accessibility information on the new Kenwood TH-D74 handheld. The model had been discussed on the Active Elements email group a few weeks earlier, but despite the radio’s obvious potential, no one had any firm details.

The TH-D74 had the prospect of being the first handheld with full speech output and accessibility to D-Star. I have very limited experience of using handheld portable radios, and the low cost handheld I reviewed a few years ago only ’spoke’ the key that had just been pressed. It could not be interrogated further to learn the current frequency, and it left me feeling that only part of the accessibility job had been done.

The Kenwood TH-D74 had the potential to be fully usable by a blind amateur, and the spec was impressive. It is a 2m and 70cm Dual Band handheld with full voice Guidance and D-Star. It has GPS, APRS, wide band coverage, including SSB on 2m and 70cms, and FM broadcast coverage. It would offer a plethora of programming possibilities, without a blind operator having to remember a set number of beeps or clicks.

Basically, the radio sounded like an ideal unit to review for accessibility. I asked Mark M0DXR of Kenwood UK if he would loan me a unit, and I have to say a big thank you to Mark for sending me the review radio for a couple of weeks. To make sure I could get onto the D-Star system I was also loaned a Digital Voice Access Point DVAP by Jeremy G4JZL.

Preparation

Before receiving the radio, it seemed a good idea to prepare myself by grabbing the PDF manual from the Kenwood site. While 99.9% of the manual was easily read by using PC screen reading software, some buttons, such as the arrow keys, are shown graphically as pictures of arrows. When read with a screen reader, a picture is ignored. So, for example, when I read the PDF manual, I learnt that you turn on the power by pressing [ ]. OK, you can work this one out, but if the command involves presses of several buttons that include the arrow keys, and these are being ignored, you cannot learn how to operate the radio.

I can fully appreciate the PDF manual will refer to a button as Menu, because Menu is written on the actual button. Likewise, if an arrow is printed on the real button, it makes perfect sense to show a picture of the arrow symbol in the manual. Sighted readers naturally expect this kind of consistency.

When you consider the tremendous effort Kenwood have gone to in making this radio accessible for blind operators, it is such a shame the manual is so hard to use. It would be incredibly helpful if Kenwood would produce a separate text only manual. The graphics being ignored are a very small number, but nevertheless, crucial!

To get over the immediate hurdle, I extracted the text from the PDF manual into a document, and Steve M6HFH went through it, replacing the blanks with text labels, such as ‘Right Arrow’ and ‘Power On/Off’. Jim MI0JPC has subsequently divided it into separate TXT files for easier navigation.

Discussing this with blind amateurs on the Active Elements email group, folk indeed like using text manuals, particularly for the ability to rapidly navigate and search them. There is general agreement that both PDF and HTML documents work extremely well, if properly structured.

D-Star Operation

I was able to rapidly establish that as a standard analogue multi-mode handheld the D74 has excellent accessibility, but the handheld also offered unparalleled access to D-Star. As primarily an HF operator, I only had a notional idea about D-Star, and I had found it easy to overlook. Having now used it, I’ve come to the conclusion that it is just another way of communicating, but with some great benefits. For one thing, you can talk and exchange greetings and ideas anywhere in the world, do so in audio comfort, and without the need for a large antenna system. This could be a great way of continuing with the hobby if you have severe antenna restrictions or even if you go into a residential home.

Getting D-Star working is a great deal easier if you already know someone using it. Rob G0WSC has been using D-Star for a while, and was able to answer many of my questions. There is a fair amount of new terminology to learn and initially the plethora of connection methods is daunting. This is not just initially daunting for the blind amateur, but seemingly for many operators. Like many things in amateur radio though, the picture becomes much clearer and simpler the more you use it.

As I’m a long way from a D-Star repeater, and very unlikely to be able to access one with a handheld, G0WSC suggested I use a Digital Voice Access Point or DVAP, and connect directly into the D-Star backbone. This means I could bypass the Repeater system. This inevitably means my review of using the D74 might well be different from your experience!

A quick note about the DVAP. I was loaned a 2M DVAP by G4JZL for the period of the evaluation. The DVAP connects via USB to a computer, in my case a Windows PC, and the appropriate software is installed. The Th-D74 then transmits and receives on a simplex frequency, in DV mode, using the DVAP.

The DVAP Windows software is not without accessibility issues. I found the setup screen did not give any feedback , using any of my screen readers. There is a second screen and you can switch to this with Alt+Tab. This screen can be read by screen readers and will show the setup screen, but you must switch back to the first screen to change the input parameters and switch back to the second screen to read any changes!

The salvation of the DVAP software is that once setup is complete, no further changes are needed. I just ran the software, tabbed twice on the unreadable screen, and pressed Enter. The connection was opened. I could then switch to the second screen and get feedback if required.

Audio Demonstration

In previous accessibility evaluations I’ve written a lot, and recorded a little. This time it seemed sensible to record as much of the Voice Guidance of the TH-D74 as possible, and this actually became a collection of short recordings that now total about 80 minutes. I have placed the separate MP3 tracks into a zipped file, available from the following link:

TH-D74 MP3 Audio Demonstration

The separate MP3 tracks are:

1 General Description 5:57
2 Introduction to Menus 3:12
3 Frequency Input 2:32
4 Squelch 1:21
5 Power Adjustment 0:40
6 Dual Band Operation 6:47
7 Memories 7:01
8 Programmable Function Keys 4:14
9 FM Repeater setup 3:39
10 DVAP 9:22
11 D-Star through DVAP 28:0
12 D-Star through Repeaters 8:10

The only key combination I will mention here is how to turn on the Voice Guidance. Simply hold the Hash key when you power on the radio.

Conclusion

If you haven’t listened to the audio tracks, you’ll still want to know if the radio is accessible. With some minor accessibility exceptions, the radio is brilliant. Not only does it give unparalleled feedback to the usual analogue operation, it includes full access to D-Star. I was unable to try APRS and the MCP programming software in the limited time I had the radio. I switched on the GPS function so I could use the Nearby Repeaters list, but I did not pursue further investigation of GPS features, beyond this.

The review radio had version 1.0 of the firmware, and at the time of writing, version 1.04 is available. Future firmware updates hopefully also give the possibility of further accessibility improvements.
Once again, Kenwood have approached accessibility very seriously for the blind operator, and done an impressive job.

Related Downloads

TH-D74E Tactile Layout and RTF Manual with Replacement Text Labels
TH-D74E Separated Text Manual

TH-D74 Menus from Ivan ZL1IA
TH-D74 MCP-D74 JAWS scripts written by Joe VK5JKS
TH-D74 Accessibility Guide written by Joe VK5JKS

TS-590SG MP3 Manual recorded by Ian DJ0HF

An unabridged MP3 recording of the Kenwood TS-590SG operating manual has been added to the Active Elements site. You can find the manual in the Recordings/Manuals section or at the foot of the TS-590 accessibility review under the Related Documents Heading. The recording has been narrated and produced by Ian DJ0HF, and each chapter has its own individual MP3 track. Just download the Zipped archive and listen to the tracks using your favourite MP3 player.

JJRadio Accessibility Review

Review of JJRadio Rig Control and Monitoring Program

By Richard B. McDonald KK6MRH

December 2014

Overview

This is a review of the JJRadio rig control and monitoring program created by Jim Shaffer KE5AL. Presently, JJRadio is designed for the Kenwood TS-2000, Kenwood TS-590 and the Elecraft K3. The program allows control of frequency, mode, memories and many other features of these transceivers. In addition, it provides accessible S-meter, SWR and other readouts. JJRadio works with Windows Vista, Windows 7 and (although not tested) Windows 8. The program is entirely operational with the keyboard. F1 lists all of JJRadio’s keyboard commands.

As a new (and blind) ham, I find JJRadio extraordinarily easy to use and powerful. Jim is blind, and so the program has specifically been written with accessibility paramount. Also, instead of trying to accomplish many rig control and monitoring functions, JJRadio focuses on the primary rig control and monitoring functions. That is, instead of trying to be a jack of all trades, JJRadio is a master of the rig control and monitoring functions hams commonly use. I have both the Kenwood ARCP-2000 (for rig control and monitoring) and the Kenwood MCP-2000 (for memory management) programs. JJRadio is way more intuitive, accessible and useful than those programs.

For this review, I am using a Kenwood TS-2000 connected to my PC running Windows 7 Professional 64-bit. JJRadio does not use Braille or speech directly. Instead, it relies on your screen reader to manage those devices. I use JAWS 13, and do not read Braille.

Finally, this review focuses on the rig control and monitoring features of JJRadio. While the program also has logging, CW, Pan Adapter and other features, these are not reviewed here. However, below in the “Related Links” section is a link to a complete help webpage where these and other program features are completely covered. There is also a link to an extremely accessible TS-2000 manual Jim created in HTML format.

Setting Up JJRadio

After installing JJRadio, the first time you start the program a few configuration screens appear. Basic information like your name, call sign, QTH and license class are entered here. Passing through the Log Characteristics and Braille options, add yourself as the Default Operator. Next comes the Rig Information dialogue.

For rig information, first enter a rig name (merely as an alias to reference your radio). Then, choose your rig model from the list box. The model selection determines the communication parameters. Although you can change many of these communication parameters, I just went with the defaults. Note that the only thing you can do with a “Generic Rig” is send commands to the radio and observe the raw output from the rig.

Finally, select a com port from a list of ports available on your system; which should already be set up. If it is not, you can cancel out and come back to this later from the Actions menu. Again, unless you changed the baud rate at the rig, use the default value. Typically, the first rig you enter will be the default rig. Tab to and press the “Last one” Button. That’s it, you’re done!

JJRadio’s Main Window

The Main Window is composed of several fields. These vary according to the operating mode (e.g., USB, FM, etc.). The first two (and always present) fields are 1) the S-meter and frequency display and 2) the operating mode. These fields are followed by several other fields, which depends on the mode you are in. For example, if you are in FM mode, you will have other fields for Offset, Tone and so on. You will not find these fields if you are in, for example, USB mode. These other fields are discussed below.

At the bottom of the Main Window there are always four fields: 1) SWR, 2) Receive Text, 3) Sent Text and 4) Status. The SWR field displays the SWR value. The Received Text field is only used to display direct commands output from your rig. When in CW mode, typing text into the Sent Text field will send the characters. The last field is the Status field, which displays information JJRadio reads from your rig.

The S-Meter and Frequency Display

The S-meter and frequency display is the first item in the main window. No matter where you are in the Main Window, F2 takes you here. Actually, it is one text box with several fields. This is where you will want to be for most operations. Basically, there are two blank spaces separating each field within this display. Below is a table schematically showing how this display is laid out for the Kenwood TS-2000:


RECEIVER S-METER SPLIT Vox VFO/Mem FREQUENCY OFFSET
xx yy T t A, B or M mm.kkk.hhh + or –


The Receiver field indicates which receiver you are on, main or sub. These are the two left-most characters within this display. The first character is PTT and the second character is control. “mm” would indicate that both PTT and control are on the main receiver. It would show “ss” if PTT and control were on the sub receiver. Toggling PTT also changes control, but control toggles independently of PTT. Note that these 2 characters are rig dependent, and are different (like for the Elecraft K3) or not present at all (like for the Kenwood TS-590).

The next field to the right is a numeric value for S-meter. It typically ranges from zero to nine, but a read of 10 means 10db over S-nine and so on.

Moving again to the right, the next field indicates if you are in split mode. If you were, it would indicate “T.” If you were not in split mode, this field is not present at all. JJRadio fully supports split operations, but I will not get into all that here. However, the help webpage goes into this thoroughly.

The next field to the right is the vox setting, “v” if on, blank if not.

Then comes the VFO/memory field, “A” or “B” for the VFO, or “M” for memory mode. See the Tips and Tricks section below for more about the “M” setting.

Next, just to the right of the VOX field is the frequency field. It is shown in the format mm.kkk.hhh; MHZ, KHZ and HZ respectively. I really like that I can adjust my frequency down to the hertz level so easily here. I cannot do this at all with the main tuning dial. Also, the frequency rounding that occurs if I use the TS-2000’s MFC knob cannot help either if I am trying to tune anywhere between the rounding steps.

Finally, the right-most field is the offset direction. It is either a plus (+) or a minus (-). If you are not in FM mode, this field is not present at all.

What makes JJRadio so powerful, easy and accessible is how all these fields are adjusted. You can use your keyboard to change any of the fields within the S-meter and frequency display. For example, if you place the cursor on any digit of the frequency and use the up and down arrow keys, it will change that digit one at a time. Try placing the cursor on the “A” (for VFO A). Press the space bar and notice you switch to the next VFO, “B” for my TS-2000. The up and down arrow keys also rotates between the VFOs. If I move the cursor to the left-most field and character within the S-meter and Frequency Display, I am on “M”: meaning PTT of the main receiver. Pressing “S” or using the arrow keys toggles me over to the sub receiver.

Other Screen Fields

Within the Main Window, tabbing from the S-meter and Frequency Display lands you on the Mode field. This shows the operating mode, which can be changed with the arrow keys. Most of the fields that follow the Mode field are modified with pull-down boxes by using the arrow keys. Among these fields are TX Tuner, RX Tuner, Antenna Tune, Antenna (HF 1 or HF 2), RX Antenna, RF Attenuator, Preamp, Mic Gain, Speech Processing, Processor Input/Output Levels, Low/Hi Filters, Noise Reduction and Power Output Level – to name a few. Many of the fields that follow the Mode field are themselves mode dependent; meaning that only fields relevant to the selected mode are shown. Also, these fields may be accessed directly by using JJRadio’s Screen Fields menu.

Memories

When you start JJRadio, the rig’s memories are loaded. The program has a memories dialogue accessed by pressing ctrl+M. This dialogue cannot be accessed until all the memories are loaded. The Status field, the last field in the Main Window, displays “memories are all loaded” when that is the case. If you try to use the memories dialogue beforehand, you just see a message telling you the memories aren’t loaded. Loading the memories typically takes about 10 seconds.

The memories dialogue displays a list of the memory numbers on the left and a bunch of memory fields on the right. You are initially placed in the memories list, at the memory your radio is set to, or was last set to. At the top of the screen is a button that initially says “Include empty memories”. You can get there easily with a back-tab. By default, only used memories are shown. If you click this button though, it’ll then say “Only used memories”, and all memories, used and empty, are displayed. If you want to add a new memory, you must show empty memories.

You can navigate the memory list with the arrow keys or the page up/down keys. Each list item shows the memory number and either the memory’s name, or the frequency if it has no name, or the word “empty” if it’s empty. The fields displayed to the right reflect what’s in the currently selected memory, and you can tab through them.

On the bottom of the screen are some buttons. Press “Change” if you have modified data in the memory’s fields. If you go to another memory or exit the dialogue without pressing the “change” button, no change is made. As the name implies, “Set from VFO” sets the selected memory to whatever the VFO is on. “Delete” empties the selected memory. “Done” exits the memories dialogue as if Escape were pressed. Also, if you are focused on a list item, just press enter to go to that memory. You will leave the memories dialogue, and the rig is set to memory mode at the selected memory. See the Tips and Tricks section below for a nifty way to access memories directly from the S-meter and Frequency Display.

TIPS AND TRICKS

I have purposely not gone through the program menus for JJRadio itself because they are so simple and intuitive. There are only three: Actions, Screen Fields and Help. The Screen Fields menu can move you quickly to the selected field of the Main Window. Frankly, I almost never use these menus.

Switching between VFO and Memory Mode

If you are in the S-meter and Frequency Display, and have the cursor on the VFO field (e.g., “A”), pressing “M” switches the rig to memory mode. This field will then show “M.” Then, just to the right of the “M” is the memory number, which you can scroll through with the arrow keys. Likewise, having the cursor on the “M”, and pressing “V” switches back to VFO mode.

RIT and XIT

Not discussed in the section above about the S-meter and Frequency Display (and not shown in the schematic table there) are the RIT and XIT values. These only appear if the RIT and/or XIT is on. The JJRadio help webpage goes into all this.

Scanning

JJRadio provides an excellent scanning feature that allows you to scan between a start and end frequency. It is access with ctrl+S. You can specify the scan step size (in KHZ) and the scan speed (in tenths of a second). The scan speed is the number of tenths of a second to spend on each frequency. While scanning, if you hear something you want to investigate, pressing the “Pause/Continue scan” key (F2) will pause the scan. You can then investigate with the VFO. Pressing F2 resumes the scan where you left off. Ctrl+Z stop the scan. You can also save your scan for later use. This is done from the dialogue where you entered the scan parameters. When saving a scan, you name the scan for future use. Ctrl+shift+U lists the saved scans. Note that if you are using a VS-3 chip, you will want to set the TS-2000’s menu 15 value to “Off” (see next).

Descriptive Menus

Among the handiest features of JJRadio is descriptive access to the Kenwood TS-2000’s menus. That is, you get words like “On” or “Off” instead of “0” or “1.” The rig’s menus are accessed with ctrl+U. This is not to be confused with JJRadio’s menus. Like the memories dialogue, this puts up a list of menu items on the left which you can navigate with the arrow keys. When an item is selected, its possible values are shown on the right; which you can get to by tabbing.

Automatic Frequency Readout

If you are using JAWS 14 or above, you will need to uncheck “Enhanced Edit Support” to get the frequency display to read-out in real time as the BFO changes. Versions prior to 14 don’t have this problem. To uncheck this, use JAWSKEY-F2 and select “Settings Center”. Search for the word “Enhanced”, and uncheck “Enhanced Edit Mode”.

Related Links

JJRadio Download Webpage

JJRadio Installation Instructions

JJRadio Help Webpage

Kenwood TS-2000 HTML Manual

New Kenwood TS-590 Evaluation Section

We have added a new section to the Kenwood TS-590 evaluation page, called ‘Assigning voice parameters to the PF buttons’.


Andor PA9D describes how to use the 590’s Menu to assign each of the 3 available voices to the Programmable Function buttons, both on the radio front panel and microphone.


The new section has a level 2 heading, for the convenience of screen reader users.

Recent Additions

Thanks to Curtis Delzer K6VFO, we have recently added a fully indexed version of the Kenwood TM-V71A/E manual. The DAISY conversion has added over 600 index markers, and allows easy navigation at 3 levels, Section, Sub Section, and Steps.

The above DAISY recording can be found on the TM-V71E Evaluation page, and from the Manuals page, accessed from Recordings.

You can also use the Search field at the top of each page to find items of interest!

Yagi Multiple Element Comparison

Yagi Multiple Element Comparison

By Kelvin Marsh, M0AID

November 2013

Back in October, following a discussion on the Active Elements reflector, I thought I would try an experiment gradually reducing the number of elements on my beam, and recording the results. I looked for the most distant station I could find, and it happened to be V6P in Micronesia on 20 metres.

The bearing was 22 degrees, and the distance was 8000 miles. Also, this was in the middle of the afternoon, and I would expect him to perhaps be stronger at other times.

The recording starts with the SteppIR antenna using 3 elements, and this is marked on the recording with 3 beeps. I then fully retract the Director, and the result has 2 beeps. Finally, I pull in the Reflector and this has one beep. I then repeat the sequence, but this time pull in the reflector first, followed by the Director. The final 3 beeps indicates a return to 3 elements.

I have to say, the difference is not huge between each retraction, but the difference between 1 and 3 elements is probably the difference between making a successful contact within a reasonable time, or spending significant time calling him without making yourself heard.

By the way, the signal strength on 3 elements was 7, and the signal strength on a single element was about 4. You can judge the readability for yourself!

The MP3 recording can be heard by clicking the following link:
V6P on 20 metres

The following day, I conducted a similar test with KH0M, but this time on 12 metres. The bearing was 30 degrees, and the distance 7500 miles. The entity is the Mariana Islands.

This time I worked him quite comfortably using 400 watts before making the recording. The difference between 1 and 3 elements is much more noticeable. Again, you will hear 3 beeps for the 3 elements, and so on. In the first few seconds you will also hear how I reduce the HF hiss by turning back the RF Gain, and during the two and single element recording you can distantly hear a Brazilian station calling on the frequency from behind me. Using the Director and Reflector dramatically reduces any signal from the back of the beam. Whilst KH0M was actually working split in the recording, attenuating unwanted signals from behind you can be extremely useful.

The MP3 recording can be heard by clicking the following link:

KH0M on 12 metres

Recent Additions

Thanks to the recording skills of Ian DJ0HF and Bill Laurie, we have recently added MP3 manuals for both the Kenwood R5000 and MFJ-998 auto tuner.  We have also added the TS-440S manual in Word document format.

The above MP3 audio and TS-440 document can be found on the Manuals page, accessed from Recordings.

You can also use the Search field at the top of each page to find items of interest!

Accessibility Review of Amateur Contact Log 4.2

Accessibility Evaluation and Demonstration of Amateur Contact Log 4.2

By Kelvin Marsh M0AID

Updated Decemmber 2013

I have been using Amateur Contact Log version 3, better known as A C Log, for about 5 years. The three great features that make AC Log stand out for me, are the integrated Cluster spots, the seamless Log Book of The World transfers, and the automatic callbook lookup.

Scott N3FJP has rewritten A C Log using C#, pronounced as C Sharp, and added several new features. Thus, Amateur Contact Log version 4 was born. In A C Log 4.2, Scott has added vital short-cut commands for blind amateurs using screen readers, and made many changes to greatly enhance the experience for those relying on speech output. Whilst I normally just comment on Ham accessibility on the Active Elements site, it was a privilege to work with Scott, and actively contribute to the AC Log accessibility project.

The Short-Cuts

AC Log is a Windows program, and a screen reader user will now be very comfortable moving through the Menu Bar, and navigating the setup dialogs. In addition, Scott has added several short-cut keys to enhance the operation of the logging area itself.

To access the Main List, use control+Q. This places the focus in the listview, and you can move through the previously logged QSOs with the use of the arrow keys. The Main List speaks perfectly, with column headings ahead of each item, and as a bonus, will read the complete line, even beyond the visible screen. While in the Main List, press the tab key to be shown various options for the selected QSO, including editing and Deletion. Again all of the options have dedicated short-cut keys. Important note, if you are a Window-Eyes screen reader user, you must have version 8.4 or later to read the Main List information in the correct order.

To access the Cluster area, use control+Z. This places the focus in the listview, and you can use the arrow up and down keys to move through the incoming cluster spots. Even though the spots are continually scrolling visually, the keyboard focus remains on the selected spot, even though it may disappear from the display. Again, all of the information for each spot is announced by the screen reader, with column headings. Simply press Enter to move the spot to your logging form, and have your radio automatically change to the frequency and mode.

There are many other accessibility benefits of the V4 rewrite, including the easy access to the Awards tables, and the ability to ‘Tab’ into the Help text in the setup dialogs. These are covered in the Overview recording below.

Usage overview

So far, we have had positive results testing A C Log with Window-Eyes, NVDA, System Access, JAWS, and ZoomText. I usually got a lockup using System Access when Calculating my Award totals, in September 2013, but I think more testing is needed by more experienced SA users.

As always, I would recommend that every user sets up a short-cut from the Desktop, to automatically run A C Log as Maximised. There may still be a need to re-label some fields, depending on the screen reader, and I think we are pushing some of the screen reader boundaries, but I have no doubt any issues can be addressed.

The one thing I’ve seen with my testing, Is that all the screen readers handle the same situation slightly differently. Scott actually installed NVDA to help with his testing, so if you are getting unexpected results, try it with NVDA to figure out what is happening.

Below, you will find three recordings. The first is an Overview looking at the screen reader accessibility of AC Log ‘out of the box’. The second shows some of the basic configuration options offered by AC Log, and how I personally use Window-Eyes to monitor areas of the screen with User Windows and Hot Spots. The third dips a bit further into how you setup User Windows and Hot Spots in the Window-Eyes screen reader.

Although I have used some advanced functions of my screen reader in the third demo, you may find the recordings give you ideas of how to customise your own access software.

Scott also offers many N3FJP contesting programs. These are being rewritten in C# at the moment, and Scott is currently incorporating many of the accessibility changes developed in AC Log.

Finally, if you want to use the integrated Voice Navigation feature offered by AC Log, Scott recommends the latest Wave files are downloaded for the C# programs. There is a link to the files in Related Downloads below.

Amateur Contact Log can be downloaded from:

http://www.n3fjp.com/aclog.html

Related Downloads

AC Log 4.2 Voice Navigation Wave Files (zipped archive)
AC Log 4.2 Overview MP3
AC Log 4.2 Configuration MP3

AC Log 4.2 Window-Eyes Extra MP3

WSRotor Accessibility Demonstration

White Stick Rotor Accessibility Review and Demonstration

By Kelvin Marsh M0AID

July 2013

This is an audio demonstration of the WSRotor software written by Don G0MDO. WSRotor allows a blind amateur to operate the ProSisTel D type rotator control box using a computer and screen reader.

The software can be downloaded from
http://www.easilog.co.uk/WSRotor.htm

Related Downloads

WSRoter MP3 Demonstration

PST 2051 Rotator Accessibility Review

Accessibility Evaluation of the ProSisTel 2051D rotator.

By Kelvin Marsh M0AID

July 2013

My first HF beam was a fairly lightweight 3 element Cushcraft A3S. I was fortunate to be given an old Kenpro KR600 rotator, and my friend G4JZL adapted the control box with a tactile pointer to show the heading. When I changed the A3S for the heavier 3 element SteppIR, it was time to beef up the rotator too.

At that time, back in 2009, I did not know any other blind amateurs with rotators. I was intrigued when I discovered that there were rotators available with computer control via RS-232 serial connection, and as I use a PC for logging and amplifier control, this seemed an intriguing possibility. I then had to satisfy myself the software could be used by a screen reader user. There was little point in investing significant sums in a new rotator that was controlled by clicking on a picture of a compass comprising of a large and inaccessible graphic!

I became aware of the ProSisTel range of rotators, as they were recommended by the UK supplier of SteppIR antennas. The PST 2051D was the recommended model for the 3 element SteppIR. The PST rotators use worm drives instead of the more traditional planetary gear wheel system, And have the advantage of being extremely sturdy and self braking. The PST 2051D is at the lower end of the model range, and PST has several much heavier offerings for very large antenna arrays. The PST 2051D is classed as a heavy duty rotator, capable of turning a full size 3 element HF beam. The rotation torque inch / lbs is 1720, and the braking torque inch / lbs is 10800 (figures taken from the Vine Communication rotator comparison table).

In a way, this evaluation is more of an accessibility review of the D type control box. Whilst I suggest this should be carefully checked before purchase, the control box should be capable of running any of the modern range of PST rotators.

The D type control box is the unit that sits in the shack, and is the hardware you would normally interact with. The box is very chunky, with an approximate height of 120mm, and a width and depth of 210mm plus front and rear panel protrusions. I only ever touch the controller when I switch it on. Whilst the control box is extremely simple to use with sight, it is not directly accessible by a blind amateur.

Photo of rotator control front panel displaying a bearing of 333 degrees, with switches for direction and power, plus a manual rotation control

Rotator control unit front panel

The current compass bearing is shown on a large digital display, and the new direction is selected by turning a rotary knob. The physical revolution of the knob bears no direct relationship to the ultimate direction. The sighted operator rotates the knob until the desired bearing is shown on the display. The knob could be rotated a few clicks, or could be turned completely several times, as there is no end stop.

Whilst I have noticed there can sometimes be a relationship between the clicks of the rotary knob and the heading for small movements, there is no reliable control possible.

Usefully, the rotator has the ability to automatically decide on the direction to turn. Just a small alteration in direction can cause the rotator to turn clockwise or counter-clockwise, to reach the desired heading with the minimum of movement. This probably sounds counter intuitive, until you understand the rotator has the potential to overlap by up to 70 degrees on either side of the selected stop position.

This probably needs a note of explanation. The rotator can be setup with a North or South stop position, and with a choice of turning ranges. Firstly, the rotor can be set to only turn by one complete revolution or 360 degrees. Secondly, to have up to a 70 degree over-lap either side of the stop position, giving a potential 520 degrees of movement. I use a 20 degree over-lap on either side of the stop position myself, so as not to overly strain the coax.

Here in the UK it is much more usual to be pointing the beam towards the South, so I decided to have a 0 degrees North stop. This means the rotator can be turning in a clockwise direction from 290 degrees West, through 0 degrees North, 90 East, 180 South, 270 West, 0 degrees North, and then keep on turning clockwise passed the North position, to a maximum of 70 degrees East. All this sounds complicated, but in reality it means you don’t have to turn the beam by almost one complete revolution, if you are wanting to point the antenna a few degrees either side of North.

So, back to the sighted operator directly using the control box. They just turn the knob to the desired heading on the digital display, there is a pause for a few seconds to allow for changes, and then the antenna turns. The control box automatically decides which way to turn to get there in the shortest time possible.

The 2051D control box also has the traditional Clockwise and Counter-Clockwise paddle switches. Again, these are of no real use to a blind operator as the display cannot be read. There is mention in the manual of the paddles being used to halt the rotator if it has been preset with the rotary knob or computer software, and there is also a warning that turning the rotator using the paddles does not invoke the slow start and stop facility.

When I first bought the rotator we set it up on the ground, without the antenna being attached, and I experimented with it. It soon became apparent that the slow start and stop feature only worked if the heading was changed using the inaccessible rotary knob, or by using computer software. If you are turning a large heavy antenna, it is highly recommended that you always use the slow start and stop. This causes the rotator to gradually reach the maximum turning speed over a few seconds, and minimises the shock to the antenna and tower of an instant start and stop.

In this photo the tower has been tilted over and the rotator is being bolted to the cage on the tower.

Close up of the rotator during installation

Therefore, the only practical method of a blind operator controlling the PST rotator, is via the PC and the serial interface. If you don’t use a computer with your amateur activities or want to directly move the antenna using the control box, it will be worth reading the Yaesu G1000DXC rotator evaluation elsewhere on the Active Elements site.

As mentioned previously, I initially had concerns regarding the accessibility of any interface software. Any blind computer user will be familiar with the perils of buying and installing that vital program, the one used by all of your sighted friends, only to find that what can be done so easily with a few mouse clicks, is impossible with a screen reader. It was at this point I contacted Don G0MDO. Don has written a very accessible logging program for blind operators, and fully understands what screen reader software needs to work successfully. Studying the PST documentation, it seemed that third party software could be used to control the rotator, and when approached, Don G0MDO, the creator of White Stick Log, began work on White Stick Rotor.

I know Don had to jump through all sorts of programming hoops to write White Stick Rotor, and had to write simulation software to mimic the PST D type control box itself. At that time, neither Don or myself owned any PST hardware! We were fortunate to have the help of Ron at Vine Communication, who was happy to conduct some tests On a real control box.

Without doubt, White Stick Rotor was the last piece of the jigsaw, and gave me the confidence to buy the PST 2051D. Over the years, Don has continued to refine WSRotor, and perhaps there is still some improvement to be made. The software is beautifully simple to operate, and Don has even made itself voicing. There is an audio demonstration of White Stick Rotor on the Evaluations page in the Software section. Suffice to say, you type in the desired bearing, press Enter, and the antenna turns.

Subsequently, I have also used the N1MM contest software to control the PST 2051D. The program can be used stand alone, but is also able to automatically turn the rotator to the bearing of the callsign just entered. I cover the N1MM rotor setup and use on the Evaluations page.

This photo shows the rotator mounted in the cage at the top of the tower

Rotator finally installed.

Finally, the rotator is designed to be fixed inside a rotator cage. The manual warns against sitting it on a surface that is likely to collect water, as this can be drawn up through the drainage holes in the casing. There is a sturdy circular revolving table on the top of the rotator with fixing holes, and there are a variety of mast clamps available to mount the stub mast.

A close up photo of the specially made adapter. Part of this fits inside the stub mast and is anchored to it. The remainder is bolted to the rotator.

Close up of the machined adapter

The best solution for me was to have a mounting plate with a solid shaft custom machined by G0WSC, to bolt to the table and to fit up inside the stub mast. The stub mast is then secured to the shaft and plate with a pin. This solution means that as the table revolves, the stub mast is perfectly centred and there will never be any slippage due to loosened clamps.

Related Downloads

PST D type rotator MP3 manual.zip

Kenwood TS-990 Accessibility Review

Accessibility Review of the Kenwood TS-990

By Kelvin Marsh M0AID

July 2013

It’s not often that one of the main amateur radio manufacturers launches a new flagship model. When Kenwood announced the TS-990S it naturally caused great interest, and I was intrigued to learn the radio would include an integral voice unit. Other recent Kenwood models can be fitted with the optional Voice Guidance and Storage unit, the VGS-1, and the built-in voice guidance might mean there was an improvement to accessibility, or might mean a reversion to former more basic functions. As you read on, you’ll see I was extremely impressed by the work done by Kenwood, and the TS-990S has made huge accessibility leaps forward!

TS990 on the desk with matching speaker, and a Kenwood mug, for those long QSO's

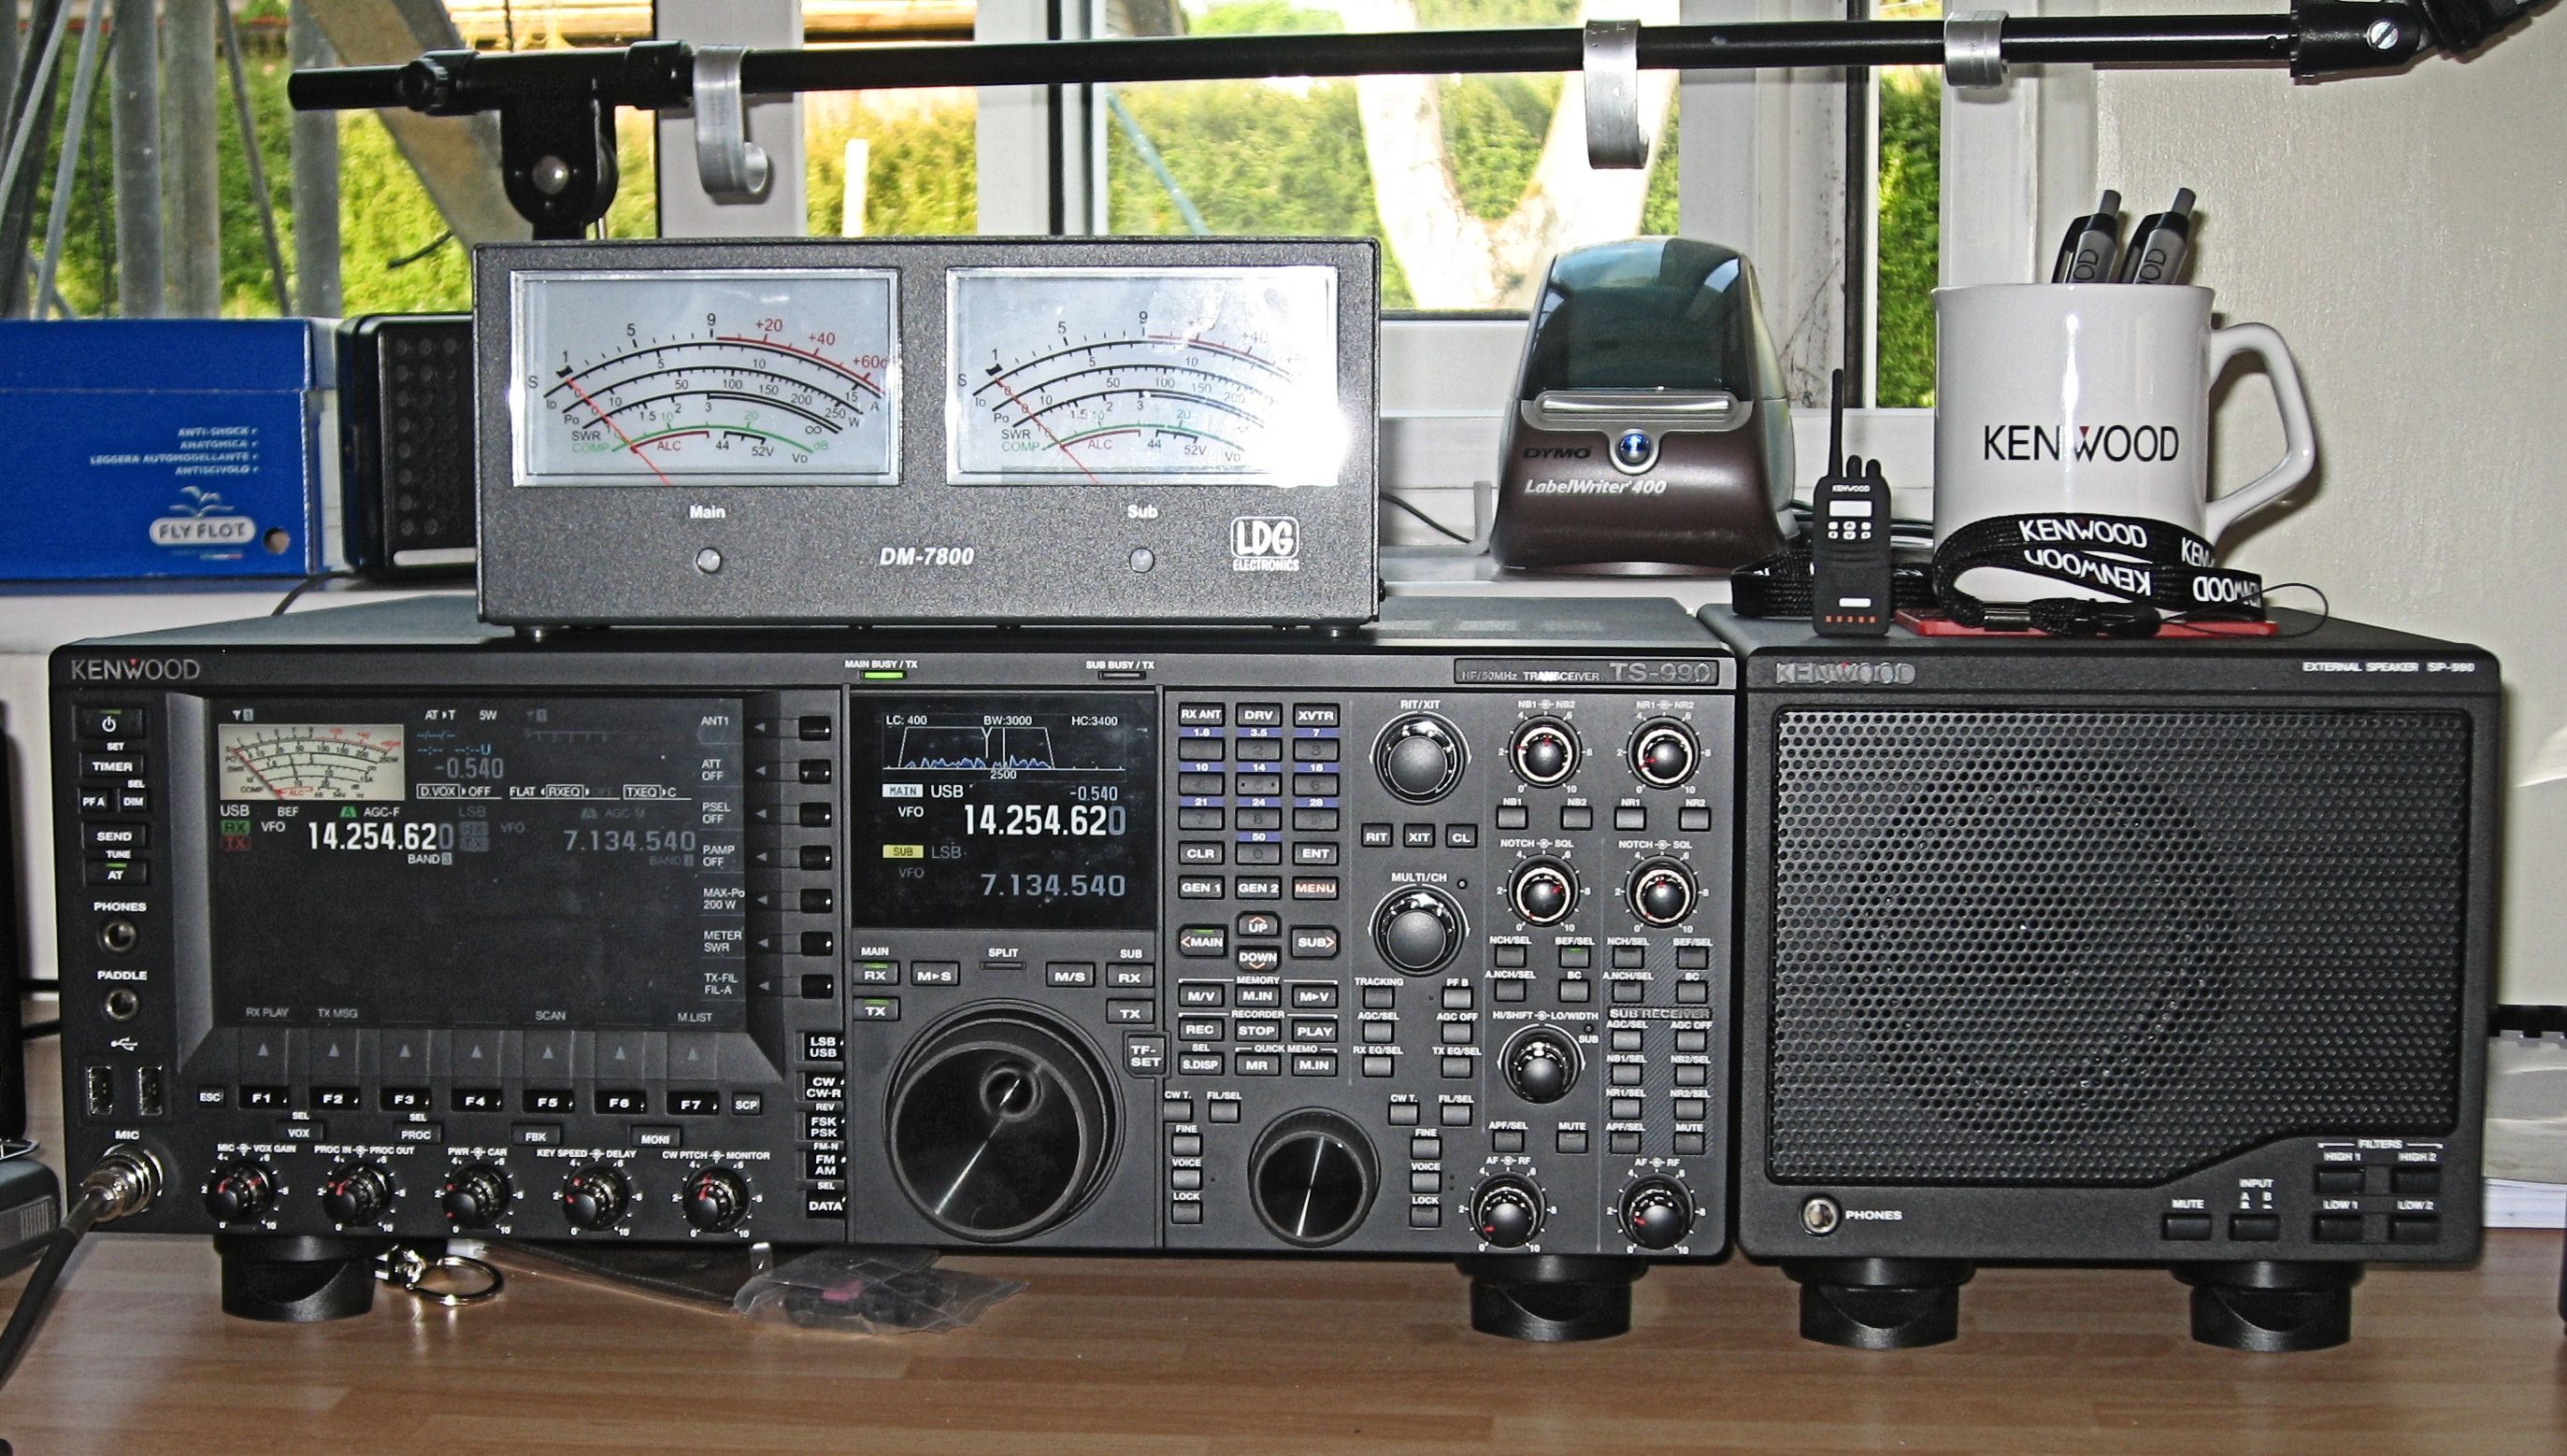
TS990 + SP990 + DM7800

The Radio

The TS-990S is a large 200 watt base station, allowing transmissions on HF and 6m. It has an integral ATU, and is mains powered. It has connections for 4 TX antennas and an RX antenna. I measured the size of the casing to be approximately 460mm wide, 160mm high, and 400mm deep, excluding front panel controls. The feet add about 40mm, making the actual height more like 200mm. This is an imposing radio!

It is sadly inevitable that much that the TS-990S has to offer will be unused or unappreciated by a blind operator. The radio has large vibrant displays, and these caused quite a stir from several of my sighted friends. The TS-990S has many data decoding options and display graphics, and I spotted in the manual it can even be used for logging, using a USB keyboard.

There are varied alternatives for getting audio into and out of the radio, and as well as Ethernet, USB and serial connectivity to a PC, both optical input and output is available, along with USB drive storage.

Undoubtedly, one of the prime attractions of the TS-990S is the ability to have two independent cross band receivers. Anyone who seriously works DX, will immediately understand the advantages of listening simultaneously to the TX and RX frequencies of the DX station.

I think that if you want to know more about the radio’s capabilities, you would be wise to read the full technical review by Peter Hart in the June 2013 RadCom. This is available in MP3 format in the Related Downloads section below.

This evaluation is looking solely at accessibility, and how the TS-990S can be used by a blind operator. I am very grateful to Kenwood Electronics UK for the loan of the review radio.

First Impressions

My first impression of the TS-990S was somewhat daunting! There are lots of controls, but it soon became apparent that Kenwood had brought all of the commonly daily used controls onto the front panel. Whilst initially overwhelming, it didn’t take long to realise I recognised every control, and they all made sense. This radio is geared up for quick and seamless operating, and while there is undoubtedly a learning curve, you won’t be digging into the menus just to increase the power.

As previously mentioned, there are two displays. The largest is positioned on the left at the top of the front panel, the smaller is approximately in the centre top with the main tuning VFO below, and the right third of the front panel is given over to button and rotary controls.

All of the buttons are a hard flat plastic, meaning there is no unpleasant dragging on the finger tips as you feel for a control, and the buttons are flat and without lumps and bumps. There are many different shapes and sizes of button, and it will take some time to become fully accustomed to their layout. In fact, I think the manual will almost certainly become your best friend, for a while at least!

Layout

In slightly more detail, there are buttons in a vertical column at the far left of the facia, and to the left of the large display. These include The power on, Timer, Programmable Function A, Send, and Auto ATU. There are 7 function keys running along the bottom edge of the main display, and a series of rotary knobs below the function keys. These are typical concentric inner and outer rotary knobs, and control Mic and VOX Gain, Processor levels, TX power levels, Key speed and Delay, and CW pitch and Monitor level. Just above and in-between these knobs are 4 further buttons related to the function of the knobs themselves.

A vertical column of 7 buttons is positioned between the displays, and they include control of Antenna selection, Pre- amp, TX power limits, the display Meter, and TX filter. Below this column are the vertically arranged Mode buttons announced with CW, and to their right, the main tuning knob.

To the right of the smaller display and Main tuning dial, at the top, is the numeric keypad, with markings on the 5. This has 3 buttons above including RX antenna selection, and transverter, and the Menu button is in the row below the keypad. Below this is the main block of buttons. These include Main and Sub band selection, with Up and Down buttons in a group. A group of 9 buttons operate the Memory system, RX record and play back, and Quick Memory.

There are 6 buttons in 2 groups of three, positioned above and either side of the main tuning knob, controlling the use of the two receivers and the Split function. There is a column of buttons to the right of the main VFO for Fine tuning adjustment, Main Voice, and main Lock. Continuing to the right along the bottom of the front panel is the smaller Sub tuning dial, and the Fine, Voice, and Lock are mirrored for the Sub receiver.

Moving to the top of the facia and to the right of the keypad is the RIT adjustment knob, with related buttons below. Below this is the Multi-Ch control, with 2 columns of 3 buttons below, for Diversity reception, PF B, AGC, and RX and TX Equaliser. It is nice to find the equaliser controls have found a place on the front panel. Below these buttons is the previously described Sub tuning VFO.

Back at the top and to the right of the RIT, are inner and outer rotary controls for Noise Blanker 1 and 2, and then Noise Reduction 1 and 2 in the top right corner. These are turned on with buttons below each knob.

Below these, and to the right of the Multi-Ch control are inner and outer rotary controls for Main Notch and Squelch, and Sub Notch and Squelch. Below these controls are buttons to control the Notch behaviour on each receiver.

Below the Main Notch knob is the band pass control. a rotary concentric inner and outer knob allow the band width to be changed.

To the right of the band pass control are 8 further buttons to control the AGC, Noise Blanker 1 and 2, Noise Reduction 1 and 2, and APH, for the sub receiver.

Finally, the bottom right corner has separate concentric inner and outer controls for main and sub AF and RF gain.

For a comprehensive front panel layout, see below in the Related Downloads section.

A note on the layout. Make no mistake, this is a complex radio! There is a large block of buttons extending below the keypad, and my sighted friends initially expressed some concerns that none of the button groups lined up with their neighbours. In reality I’ve not found this a problem, but the button area is busy. I think that having a varied tactile layout can aid navigation, and as I’ve become accustomed to how everything fits together, I’ve found the different shapes and positions actually helps me find the needed control. The manual is currently available in PDF format, and I found it quite easy to use with the Window-Eyes screen reader, and it is essential reading to understand the TS-990S operation. As a blind user, you will certainly also need a full front panel description in the learning stages.

One small criticism about the numeric keypad, I personally don’t feel there is enough space around it for rapid tactile use. There is a row of 3 keys directly above and below the keypad, and only the slightest increased separation between them. I can’t help feeling that over the course of the radio’s life, a blind user will potentially use the keypad thousands of times and very swift operation is only possible once the first button press has been verified as correct. Saying that, the keypad is fully voiced, which is a tremendous asset.

Preparations

The TS-990 has the integral automatic announcement voice guidance switched off by default. As a blind user, you will want to turn it on. This can be done through the menu system, but the easiest method is to hold the PF A button when the radio is switched on.

Kenwood have been able to loan me the radio for just over a week, and I will be the first to admit the rich feature set of the TS-990 will need much longer to investigate fully. I discover something new in terms of accessibility every time I switch on the radio, and you will understand why as you read on.

Traditionally, amateur radios have been made accessible by announcing button presses, and announcing the result of any changes. The TS-990S does not slavishly follow this convention, but has taken huge strides in accessibility by giving spoken announcements to the changes being made on the displays through the Function keys. This means that even the very advanced options, such as recording audio messages, can be easily managed by interacting directly with the display a sighted operator uses!

I normally write about the great Kenwood accessibility to the menu and memory systems, and all of this is spoken as we have come to expect from Kenwood, but we are not used to having such accessibility to the more advanced functions of high end radios. The TS-990S, in my opinion, has moved the game forward in leaps and bounds.

It seems to me that the traditional menu system is now more reserved for adjusting little used settings, the kind of options you set and forget. All of the more commonly used features have either been given their own control on the front panel, or are adjusted on the main display using the Function buttons running along the bottom of the display. I believe it is this accessibility to using the Function Keys that really sets the TS-990S apart.

Once I had started the automatic announcement of the Voice Guidance, by switching on with the PF A key held, I decided to install the Kenwood ARCP software on my PC. This is free from the Kenwood site, and it immediately gave me access to the menu system via the PC, using my screen reader. The Menu is accessible using just the radio, but only the menu numbers are spoken, and you will need an external list of the menu structure to browse through it successfully.

The big advantage of using the ARCP software is that it is accessible, and each menu option is described. I’ve not actually spent much time investigating the software, but the pulldown menus seem to work well, and it seems to me this is certainly an easy way to make Menu changes. Any changes made using the ARCP are immediately seen on the radio, and similarly, any changes made to the menu on the radio were immediately seen on the PC.

Using the software, the Menu is shown as a Tree-View, and each group is then opened to show the options. When you want to make a parameter change, just tab through the Checkboxes.

If you use the rig to make menu changes, just press the Menu button, move through the options with the Multi-Ch control, and press F4 to select. The use of the F4 function key, as the selection button, was my introduction to using the function keys.

As is my preference, I was able to set the Multi-Ch control to 1kHz steps for each rotary click, and the frequency is moved to the round figure. This means I can tune for a signal, and providing it is on a round frequency such as 7.106.00, I can make the final tweak with the Multi-CH control.

I also like the VFO to move by 5kHz for every complete revolution of the main VFO, and this was easy to set. When the Fine frequency button was engaged, each revolution then moved by 500 Hertz, meaning I would move from 7.100.00 to 7.100.50. I was also very pleased to see the frequency was announced to the Hertz level with the Fine adjustment engaged. The frequency is announced as 7.100.500.

Operating

Over the course of the evaluation I found that visits to the Menu were very infrequent. As I’ve previously mentioned, all of the common functions of the radio are controlled from the front panel. I found that when I needed an announcement I got one, and when the voice would have been obtrusive, I got useful beeps.
I guess the Antenna change button and the Attenuator buttons sum up this approach. These buttons are in the column between the displays. Press the top button for aerial selection, and you hear ‘Antenna 2’. Subsequent presses give ‘Antenna 3’ and so on.

Move down to the Attenuator button and you hear one high pitched beep for 6dB, two beeps for 12dB, three beeps for 18dB, and a single lower tone for off. Holding the button takes you in the reverse direction.

The third button in the column is the Preselect. This button Beeps for on and off with a momentary press, and when held it announces the setting, and can be adjusted with the Multi-Ch control or the function keys. F1 held, will reset back to default.

MP3 Demo of Antenna Attenuator and Preselector keys

The fifth button in the column, the TX Power Limit button, allows you to set power limits on each band, and between data, non data, and Tune.

MP3 Demo of Power Limit Setup

The TS-990S has many options for assigning programmable function buttons. There are two dedicated buttons on the front panel, labelled PF A and PF B. By default, the PF A key announces incoming signal strength, or outgoing power when sending RF. PF B works in conjunction with the Meter button, and can announce Power and SWR when transmitting.

The Up and Down buttons on the microphone can also be assigned as PF keys, and an external unit can be constructed for eight additional PF keys. The optional MC-47 fist microphone has 4 extra buttons available for programming, and I calculate this would give the dizzying possibility of 18 programmable keys. As so many functions can be assigned to a PF key, this gives lots of options to move commonly used keys to somewhere more easily accessed.

Traditionally, the frequency announcement itself has been assigned to one of the available PF keys, but the TS-990S has two dedicated Voice buttons for both the Main and Sub receivers, so the PF keys are not needed for frequency announcement.

Continuing with our look at the vertical column of buttons between the displays, the sixth button, the Meter selection, is a pleasure to use. Among the options, the SWR, ALC, and Power are announced by transmitting RF and simultaneously pressing the PF B button. On the Meter screen, Processor is only announced if the Processor is enabled.

MP3 Demo of PF keys

I found the lower left row of rotary controls very easy to use, as although there is no voice announcement on the majority of them, the notch in the control can be felt. If we look at the first knob, the inner is the Mic Gain, and the outer the VOX Gain. Using the adjacent button gives access to the VOX Delay and Anti Vox setup on the display. Changes are made with the function keys.

MP3 Demo of VOX Setup

Split operation is very slick, with a dual watch function allowing the Main and Sub RX to be separated into left and right ear pieces. I needed to enter the menu to set the 50/50 balance for the headphones. All of the Main and Sub functions work very well, and Split operation is clearly announced.
A momentary press of the Split key announces ‘Split On’.

Holding the Split key announces ‘Split Enter’. If you then press a 5 on the keypad, the Sub receiver is instantly set 5kHz higher. If the Main is set to 7.100, you hear ‘Split TX 7.105’.

MP3 Demo of Split Operation

As we have come to expect with Kenwood radios, the memory system is accessible. As well as storing Simplex frequencies, using the F6 key when storing, Will allow the Sub band to be included. When subsequently scrolling through the memory channels, the duplex channels are announced with a ‘D’, and simplex channels with ‘S’.

The TS-990S has 6 channels to record voice messages. The messages are controlled using the function keys, running along the bottom of the main screen. Again, these buttons give enough spoken feedback for operation without sight.

To record a voice message press F2, you will hear ‘Voice Message’.

Press and hold F2 through F7, which corresponds to message channel 1 through 6. If you press and hold F2 for message channel 1, you will hear ‘Record Mic’. At this point you can change the input source, but the default is mic.

Press and hold F4 and make your recording. If you press F2, your message is played back.

MP3 Demo of Audio Messages

Setting the CTCSS tone is a good example of the TS-990S accessibility for lesser used features. Firstly, change the mode to FM, and press and hold F4. You will hear ‘Main Tone 88.5’.

Next press F6 to select the Main or Sub band. You will hear ‘Main’. F6 now toggles between Main and Sub.

Use F2 and F3 to switch between Tone and CTCSS, and use F4 and F5 or the Multi-Ch knob to move between the frequencies.

Press Escape when you’re done, and remember that holding F1 resets back to the default.

MP3 Demo of CTCSS Setup

Recording communication audio. You can record a maximum of 30 seconds of audio data per file to internal memory or a maximum of 9 hours of audio to a USB thumb drive. I found the Record, Stop, and Play buttons allowed me to capture received audio, and replay it instantly. Pressing F1 announced ‘Audio file’, and I was able to move through each of the previously recorded clips and play them.

AGC. The AGC buttons are available for both the Main and Sub receivers. There are full announcements for Fast, Medium, and Slow, along with their values. Holding the AGC button enters the AGC setup, and the values are easily adjusted and saved.

MP3 Demo of AGC Operation

I’ve mentioned the memory channel system is fully accessible, and the quick memories work well too. Interestingly, pressing Enter, and then rotating the Multi-Ch control, takes you through the history of frequencies entered through the keypad. A very nice touch, and again all announced.

Briefly, I found the Timer functions were announced, and while I did not complete the setup, programming the clock and setting a sleep timer all looked to be accessible. There is a Lock key for each receiver, and similarly two Mute buttons. Very usefully, I found the radio would announce its status at switch on, if it had been left in setup mode, or in Split mode, when it was switched off.

Conclusions

In summary, I am incredibly impressed with the accessibility built into the TS-990S. It seems the voice announcements allow the operator to make almost any change, as a sighted user would. I installed the ARCP software and this meant I could browse the menu system with descriptions, but whilst useful, it is not strictly necessary, as the menu plays a more minor role in this radio. Having the radio for just a week meant there is much more to discover, and no doubt much better ways of doing things, but I’m sure the audio demonstrations will give you a good idea of the tremendous work that has gone into making this radio fully accessible. Congratulations to Kenwood, for a flagship radio with truly superb accessibility!

Related Downloads

TS-990S Front Panel Layout.doc
TS-990S MP3 Recording of the June 2013 RSGB RadCom Review by Peter Hart
This article is © of the Radio Society of Great Britain (RSGB) and was originally published in their magazine, RadCom, 06 2013. It is reproduced here with their kind permission. For more information about the RSGB please visit http://www.rsgb.org.

Kenwood TM-V71E Accessibility Review

Image of TMV71E with detached head and microphone on top of radio.
Accessibility Evaluation of the Kenwood TM-V71E

By Kelvin Marsh M0AID

June 2013

The Kenwood TM-V71E is a mobile VHF and UHF transceiver for FM communication. There is not a terrific choice available for a blind amateur in this market with accessibility, and if you want a multi-mode radio, your best bet is probably one of the so called ‘shack in a box’ transceivers that also covers HF.

The TM-V71E has been around for several years, and is considered to be near or at the top of the shopping list for blind amateurs wanting a 2m and 70cm FM radio. Although generally accepted as one of the most accessible radios in this market, I thought it would be worth evaluating the TM-V71E, and I thought it was useful to jot down some of my findings.

I don’t intend to write a full review, and I am delighted that there are so many accessible resources available to get you started. Under the Related Documents section on this page are an MP3 review and demo by David 2M0TSR, the full manual recorded in MP3, and the full manual in HTML format. Each describes the layout and operation, and I would encourage any owner to check them out.

I have evaluated the TM-V71E, and this is the European version. I believe the other versions are very similar in operation, but with frequency allocations more appropriate to their region.

As I am almost entirely an HF operator, I was initially surprised by the small size of the TM-V71E! I’ve approximately measured the width to be 140mm, the depth 190mm plus front controls, and the height about 40mm.

The radio has one N type antenna socket, computer and TNC sockets, and will support two external speakers, one for each VFO. It transmits on 2m and 70cm, and has three power levels. Low is 5 watts, Medium is 10 watts, and High is 50 watts. There is no numeric keypad on the front panel, but the chunky microphone has a keypad, and 4 additional programmable buttons. The radio can also be used to receive frequencies outside of the amateur bands in FM and AM modes.

The front panel controls are very well defined, and the buttons are a hard plastic giving no finger drag as you move from control to control. There is a small tuning knob at the bottom left of the facia, And this clicks as you tune through the frequency steps. This knob is also used for selecting memory channels and moving through the Menu. The bottom right has two Volume and Squelch knobs, for independent VFO a and VFO B control. These knobs and the Tuning knob can also be pressed for additional functions.

The test radio was fitted with the optional VGS-1 voice guide. This gives spoken access to the majority of button presses, but I must stress that there is still a need to read and understand the operating guide, as the radio is surprisingly complex in use, and there are several potential pitfalls just waiting to trap the casual blind operator .

The Memories are spoken, giving accessibility to the storage of repeater programming, and the Menu system can be navigated with speech output. In line with other Kenwood radios I have tested, the Menu channels are not fully described as you move from item to item, and it is necessary to have an external reference list at hand.

Menu access is achieved by pressing the Function key followed by the Tuning knob. You are given the spoken prompt ‘Menu 001’, and further turns of the Tuning knob click through to ‘Menu 002’ and so on. As you move through the menu, the selected parameters are not automatically spoken for each menu. I found I had to press the Tuning knob to be placed into a talking list of the parameters. A further press of the Tuning knob saved the setting, and returned me to the menu list.

Using the microphone keypad, it is very straightforward to enter a direct frequency, but first, one of the Programmable Function (PF) buttons must be designated as Enter. I found that it was ideal to use one of the four PF buttons on the mic for this purpose, and menus 509 to 512 can be used to set these buttons. I found the PF keys seem to be programmed in the reverse order to my expectation. For example, 512 is the top PF button on the mike, and 509 is the bottom button.

The tone key cycles through Tone, CTCSS, or DCS, and Off. These functions are not initially spoken, and each setting has the same higher pitched beep, with the Off position having a lower beep. I also found that when on the CTCss and DCS positions, the radio usefully became silent, as only signals with the appropriate coding are allowed through. I guess this might cause some head scratching if the tone button is pressed accidentally.

If I needed to set the CTCSS, I pressed the Tone button until I heard the lower pitched beep of the Off position, pressed a further two times, and pressed function. Now, a further press of the Tone button would speak ‘CTCSS frequency 88.5’. The tuning knob is then used to make the selection, and a further press of the Tone button saved the setting.
In its simplest operation, I found the Rev key worked by switching the input and output frequencies when listening to a repeater. I briefly investigated the more advanced Rev functions, and I could change the plus or minus offset frequency. Pressing Function followed by Rev toggled the settings between Off, minus, and plus. The Off position, where there is no offset, gave a low pitched tone, and plus and minus gave a higher pitched tone. At each stage I pressed VFO A volume control to read the frequency, in conjunction with the Rev key, to find out what I had changed. There is plenty of scope for confusion using this function, and I suspect there will seldom be a need to use it beyond initial setup, and possibly never.

Here in the UK, the 2m repeater outputs are in the frequency range 145.600 to 145.800. I found that entering a frequency in the repeater block automatically set the correct offset for the transmit. It is then just a matter of selecting the right CTCSS tone and saving to memory.

As we have come to expect from Kenwood, the memory channels are fully accessible. The channel numbers are spoken and their status is announced. If you have lots of repeaters in your area, it would be useful to maintain a list of frequencies and the memory channels used. There is a facility to label memory channels, and while the actual labelling process was inaccessible, I did add one label, with sighted help, to see what happened. Unfortunately, only the channel and frequency were spoken, the tag was ignored.

Since I started to evaluate the radio, I was intrigued by the voice announcing ‘PM2’ at the power on. Investigating further, the radio has 5 Programmable Memory states. This allows a single user to setup the radio for several types of operating or for use in different localities. It also means that several different users can tailor the functions to their particular preference, and store the individual setup.

This system is again accessible, but I think could cause a degree of confusion if the wrong buttons are pressed. Imagine setting up the PF keys on the microphone in PM1, and then accidentally moving to PM2. All the settings still reside in PM1, but appear to be lost.

With this scenario in mind, the way of changing the PM status is as follows. Simply press the PM button until ‘PM’ is heard, and then press one of the keys running along the bottom of the front panel. The Call key turns PM mode off, the Function key moves you to PM1, the tone key to PM2, and so on.

The memo and conversation functions of the VGS-1 work as described in the manual, and can be easily used.

Unfortunately, I could find no way of having the VGS-1 tell me the incoming signal strength.

Overall the Kenwood TM-V71E is highly accessible, but there are still some areas where the blind operator has to infer the information, rather than being told it explicitly. I am personally surprised at the complexity and rich feature set of this small VHF and UHF radio, and it is certainly a unit where the manual needs to be read thoroughly. Once again, Kenwood have worked extremely hard to make the TM-V71E very accessible through the VGS-1 voice guidance system.

Related Downloads

Kenwood TM-V71E MP3 Audio Review by David 2M0TSR
TM-V71E Full MP3 Manual (Please Right click and Save Target As:
TM-V71E Full DAISY Manual (Please Right click and Save Target As:
Rob K6DQ has prepared a fully accessible HTML manual, and related files
Kenwood TM-V71E K6DQ files
Download and unzip this truly excellent file containing a fully indexed HTML web page giving links to the text and descriptions of the user manual
The K6DQ file also contains:
Kenwood TM-V71E HTML Menu description
Kenwood TM-V71E TXT Microphone Keypad Description
Kenwood TM-V71E TXT Front Panel Description
Handihams have, at the time of writing, the following files and audio tutorials in their Manuals section:
tmv71_layout.mp3
tmv71a.mp3
tmv71a_brochure.txt

Ham Morse iPhone app Accessibility Review

Ham Morse iPhone app Accessibility Review

By Deborah Armstrong, KF6BKR

June 2013

Ham Morse is very accessible. I’ve reviewed it on applevis.

http://www.applevis.com/apps/ios/education/ham-morse

I use it in conjunction with the G4FON Koch trainer; this one is easier to carry

in my purse! G4FON gives you more practice in real-world conditions. This app is

better if you are trying out different learning methods as it supports them all.

One important point: if you choose the Koch method with this app, the add and remove

character button labels are reversed. So choose remove to add a new character and

you’ll do fine.

Take Another Stab at CW G4FON Accessibility Review

Take another Stab AT CW

By Deborah Armstrong, KF6BKR

June 2013

Are you one of those who waited to get your general or extra after the code requirements were dropped? Or are you like me,an advanced who plateaued somewhere around 15WPM and just couldn’t seem to get beyond that speed?

Or perhaps you used to copy fairly fast, but now the skill is rusty.

Of course, many of us have no desire to learn CW and that’s just fine. There is a place in ham radio for a variety of avocations.

But suppose being a high-speed CW OP appeals to you. Noticing all the noise on the bands lately, I wanted to grab a pee-wee antenna and climb a mountain to get away from it. But phone QRP is not as exciting as using code, and CW is the only thing that’s really going to punch through all that noise. Those of us plagued with local antenna restrictions might view CW as a way to enjoy operating under the radar.

Besides, I wanted to understand beacons or even a repeater ID without struggling to copy the faster transmissions. And sometimes, hearing a strong CW QSO on my shortwave, I was just so curious about what those two hams were ragchewing about. And of course, I’d love to expertly operate those accessible rigs with CW frequency and menu readouts!

To master CW, we’ve been told that all we need to do is practice, and surfing the web, we discover that multiple learning ideas and tutorial software abounds. We can purchase or run free applications on most any computer, including our smartphones. We can buy the pocket Morse code trainer from MFJ, or use old-fashioned tapes. I even bought a set of old Morse code training records for a buck at a swap meet.

I attempted to practice with many offerings, and was still stuck on my plateau. As a blind ham, I felt kind of embarrassed, as many of my other visually impaired friends took to code like a duck to water. I also found much of the tutorial software inaccessible; I memorized the tapes and records and even though I walked around silently repeating dits and dahs to myself, as soon as the speed of others’ code shot up, I was five or more letters behind trying to copy.

Ray Goff, G4FON, and Dave Finley, N1IRZ had the same problem. Though accomplished tinkerers and communicators, they too had despaired of learning the code, despite attempts to practice using a variety of methods. When I discovered how they’d succeeded, I knew I’d found my solution.

Many methods are based on having you build a look-up table in your head; three dits is an S, 4 dits is an H. Farnsworth spacing gives you enough time to rapidly search that table to copy each character, before the next is sent.

Lugwig Koch, a German psychologist in the 1930s, felt that learning code this way was all wrong. He suggested we learn CW at the high speed in which we ultimately intend to copy so we never develop the limiting habit of searching that mental look-up table. His Koch method trains your reflexes by starting first with just two characters, and after you’re able to copy them with 90% accuracy, you then add a third character. Progressing at your own pace,you can copy characters, digits and prosigns, whole words, and eventually entire conversations in your head. And you learn this all at rapid-fire speed!

The Koch method is rewarding because you are always copying fast code. It motivates practice, because success is immediate. You work at a pace that is individualized for just you, learning what you can, when you find the time. The only real requirement is that the practice should be regular.

It doesn’t take talent or a good ear, or any special ability except the willingness to drill. Dave was so taken with the Koch method he wrote several articles on, and single-handedly revived the technique. Back in the 1930s, Koch’s research had been a curiosity as it was impractical to implement. To achieve his successes of teaching volunteers in 12 hours to copy all characters at high speeds, Koch needed human operators who could repeatedly drill his subjects. Dave realized today computers can do that, so he wrote “Morse Code: Breaking The Barrier” which was published by MFJ. In this book, Dave explains how to configure Morse tutor software for the Koch method. And of course, the MFJ-418, their pocket tutor can also be configured for Koch.

But I find the MFJ-418 mostly inaccessible, because its layered menus are difficult to memorize. When I asked on the blind-hams Internet list for thoughts about accessible software, the clear recommendation was to use the Koch trainer written by Ray, G4FON.

Ray’s Windows software works with JAWS, NVDA, Window-Eyes, System Access and SuperNova. I’ve tried it with them all. I also tried it under both Windows XP and 64-bit Windows 7 and Ray claims it works all the way back to Windows 95. And because it’s already set up for the Koch method, you don’t need to change the number of characters, or the order in which they are presented. Best of all it’s free.

The Koch trainer screen’s layout keeps most options in view. There are only two items on its menu bar, file and About. Under about, there’s a single help screen. Under file, you can choose to record the audio it sends in MP3; you can exit help or call up a single dialog box for Setup. It’s really not necessary to fool with the setup at all.

Under the menu bar, there are clearly labeled icons, toolbar buttons for Start, Stop, Setup and Finish. Setup takes you to the same configuration dialog you could access from the File menu. Start and stop begin and halt a training session. Finish exits the program. You can click directly on the graphics or on their corresponding labels below them. You can use a screen reader’s graphics labeler to label the graphics too, though that’s not necessary, since clicking on the onscreen label also activates the button.

Though there is no keyboard access to these buttons, a helper program, discussed below, will give you all the keyboard access you need. If you hover over one of the toolbar icons with the mouse, its corresponding label is also highlighted, making it very easy to use even for those who are not computer whizzes.

The remainder of the screen is a grid filled with controls, which can be clicked on or accept focus by repeatedly pressing TAB or SHIFT-Tab. These are spin boxes, radio buttons or check boxes. They are not in any logical tab order unfortunately, and I’ve emailed Ray suggesting that would be a simple change to improve their ease of access. The spacebar toggles a check box, arrows change the selected radio button or spin the value up or down in a spin control. These are labeled in a way that a screen reader can correctly identify, but will not be read automatically; you must use the screen reader’s keystroke to read the current control or object to determine its current state. If you are an advanced user of a screen reader you can also tell it to “re-class” the controls so it can better read them interactively.

Mostly these settings can be left alone, but a few require some explanation.

I was initially frustrated that no obvious setting appeared for creating pauses between characters. Working at the default 20 words per minute, I couldn’t keep up, even with just two characters. Searching forums, I found sighted people complained they couldn’t write that fast either. I realized it wasn’t a question of typing or writing fast, but reacting fast, which I had made yet no effort to train myself to do. You can set “actual” and “effective” code speed. By default, both were at 20 WPM, and I had to experiment with each of them until I got it to send fast enough to be challenging but slow enough I had time to react. Pauses occur when “effective” is faster than “actual”. Of course as I progress, I’ll keep increasing these values. Depending on your tolerance for frustration and your proficiency, you’ll definitely want to experiment with both these settings. Sometimes when changing one, the other changes as well, so it takes a bit of fiddling to get them to work for your current skill level. And because your progress will be rapid, you’ll find you have to keep fiddling with them every few sessions. Admittedly, this is a bit quicker to do with a mouse, but though cumbersome for a keyboard user, it’s accessible and easy to do.

The characters spin box selects the number of characters you’ll be drilled on. A beginner starts with 2, and after mastering them, moves on to 3, 4 and then 5. Eventually, you spin that setting up to 40, which is the highest it goes. The order in which new characters is presented can be changed in Setup, but I figured Koch knew more than I, so I didn’t touch that setting.

The “display delay” controls how long the program waits before presenting the “answer” onscreen after sending a character. Because I am not copying with focus staying in the Koch Trainer window, the delay doesn’t really matter, but if you want your screen reader to read, in real-time, the characters as they appear onscreen, you can give the delay a try. In general a screen reader will simply repeat the entire text as it’s rewritten to the screen, so I believe that keeping your focus in the Koch trainer window while it is sending is more confusing than helpful. People who see the screen should also experiment with whether they like watching the answers appear, or would rather minimize the program while it’s sending.

When I turn off speech and work with a Braille display, having the characters appear just a quarter second after I copy them is very useful. This is how I practice copying in my head, and for my needs I alternate copying in my head with typing in my copy so I’ll be equally proficient at both.

The remainder of the settings onscreen are best avoided by the beginner, but very useful for ops who need to practice under band conditions. You can turn on QRM and adjust a simulated noise level. You can reduce the signal strength, enable QSB, and even put a chirp on the signal, or have it simulate code sent by a straight key. You can also toggle variable weight, speed and pitch dither , and truly force it to send you Morse that’s not at all easy to decipher!

I’ve describe settings which are always available in this onscreen grid. They are automatically saved as soon as you change them, and when you run the program again, they’ll be configured just as you left them. There is no way I’ve found to return to the program defaults.

If you pull up the setup dialog under the file menu, you can adjust more advanced parameters. You can tell the simulated straight key OP to send with a bad fist. You can control some rigs. You can type in text for it to send.

The only setting I find in this dialog to be useful for the beginner is “session length” which defaults to five minutes. For me, five minutes is tiring and a 2-minute session is plenty. I set “session length” to 2 and have multiple 2-minute practice periods throughout the day. You could also increase the session length, record the output and keep troublesome practice sessions on your music player. (To record within the trainer program, you’ll need to install the Lame MP3 Encoder.)

This setup dialog has no cancel button, so you have to click OK to dismiss it. It also has the effect of saving your settings, so be careful about making changes.

Using the trainer is easy. Click its toolbar Start button, and it will begin randomly sending groups of the letters K and M. Some groups are five characters, some are only 1 or 2.

Most people copy using a pencil and paper. I first switched to a new window and simply typed the results in to Notepad. At the end of a session, which will stop automatically, you are supposed to manually compare your results with the characters that appear in the trainer’s window.

But looking further on Ray’s site, I discovered the helper program KOCH-RX, which must be unzipped and copied to the same directory where the Koch trainer resides. Koch-Rx gives you an edit box where you can type in your copy and a button to compare your results with the text that was sent. You can quickly learn if you are up to the 90% accuracy you need before adding another character. And, Koch-RX adds keyboard control, so you simply tab to a Start and Stop button. Once you click or press Space on Start, your focus is automatically redirected to the edit field where you type in your copy. KOCH-RX therefore is perfect for the screen reader user or anyone who doesn’t want to manually compare their results and calculate percentages!

In the Koch trainer, the results are in an ordinary read-only edit box, which is sandwiched in tab order between the many other check boxes, spin boxes and radio buttons on the grid. Note that screen readers will see it as an unlabeled edit field. Visually, it appears near the bottom of the screen, making it easy to magnify just that results box. It’s also possible to simply park your Braille display in that box, so you can easily view the text after it’s been sent.

And if you are a rank beginner, this is how to learn. Simply focus on the results and watch the characters appear without attempting to copy. You will soon be hearing the difference between the K and M characters and want to start trying to copy them.

Because I already knew the characters, my goal was to learn to copy faster. I first tried setting it to all 40 characters, but found it was like copying off the air. I wasn’t very good. I set it back to 2 characters, and kept increasing the speeds, until I could tell the difference between K and M at 35 words per minute. Then I spun the characters box to 3, and the software added the letter R. I quickly discovered my reflexes weren’t fast enough and I had to drop down to 15 WPM until I could accurately respond to the letter R sent among a forest of Ks and Ms.

I also tried copying in Braille, quickly realizing that though I now could copy some characters at 35WPM, and I can certainly write Braille quickly as well, that combining those two abilities was going to require additional practice. Were I not already a proficient typist, I well might have decided to either stick with writing Braille or simply copying in my head. For now, Braille goes on the back burner, because I’m rarely going to use it in the field.

Though it isn’t mentioned in the literature on Koch, I personally found that knowing when a random group ended and it was time to type a space in my copy was even more difficult than recognizing the individual characters. I tended to type in long strings of characters without spaces. When copying a real QSO it’s pretty easy to insert spaces later, and pick missing characters from context. But having to pay attention to the spacing to know when a random group ends really sharpens your listening!

As you develop speed using Koch, you realize that it’s a lot like jumping rope, dancing, throwing a ball, touch typing, or even handwriting. Though a small child may need to think about how to write the letter W, and might confuse it with M, an adult writes automatically, with no conscious thought. As a fast typist, I can quickly hit the letters Z and X without making mistakes, and without thinking about which finger to use or where to reach. My reflexes have been honed for rapid typing by years of practice.

My CW reflexes still have a way to go, but the plateau has melted and I’ve made more progress in just a few days than I’ve experienced over the years.

As you become yet more advanced, the program, and the G4FON site, also contain files containing over 300 sample test QSOS. Though the code requirement isn’t part of today’s licensing, the original tests are still quite useful for skill-building. You can also download code practice MP3 files at various speeds from the ARRL site.

The Koch trainer gives you that chance to build the reflexes you’ll need to copy real on-the-air QSOS. And once your reflexes take over, you can relax and free your brain to enjoy the conversation.

If you aren’t at a Windows computer the iPhone app, HamMorse, is known to work well with Voice Over, the screen access solution for Apple products. There are also several other Koch training apps for Mac, Android and iOS. You can continue to improve those reflexes while you are out and about.

If you doubt the power of reflexes, just watch a teenager message her friends on her cellphone. She may balk at practicing the piano, and fail to do kitchen chores with the speed and efficiency of her mom, but I bet she can outpace her parents when it comes to texting! If we all view CW practice in the same playful light, we will have our reflexes trained in no time!

(Deborah Armstrong, KF6BKR)