
Accessibility Evaluation of Icom IC-7200
By Kelvin Marsh M0AID
December 2010
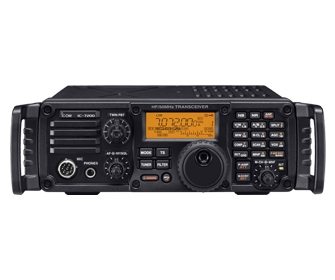
Several of our blind members have shown interest in the IC-7200. It is priced competitively as a mid-range HF base station, and is compact enough for mobile or field day use. The radio is marketed as being ‘rugged’, and my first impressions were of a compact and solid radio. Icom UK were kind enough to loan me the evaluation radio, and it was fitted with the optional carrying handles mounted on the corners of the front panel. These add to the go anywhere feel of the radio, and give a degree of protection to the knobs and dials on the facia.
The IC-7200 is a HF and 6M transceiver. It has one SO239 socket at the rear, and has CAT via USB to link to a PC. Maximum power is 100 watts, with a Tuner button allowing seamless operation with an optional external ATU.
In common with most modern Icom amateur radios, the IC-7200 has a voice chip fitted as standard. The voice chip reads Signal Strength, Frequency, and Mode when the Voice button is pressed. The menu system does not speak, but adjustments can be made to the voice synthesizer, such as changing volume. I immediately turned on the menu setting to make the Mode button speak, but I needed sighted help to navigate the menu. I was pleased to find the radio gave an audio indication when band edges were found, and this was the default setting.
The front panel of the IC-7200 is uncluttered, and initially seems to have too few buttons and knobs. To the left of the VFO are dedicated controls for adjusting Band Pass filtering. A nice touch on the smaller Icom radios, allowing easy band shape changes without the need to access multi-level menus. The AF volume, RF gain, and Squelch are adjusted with the traditional inner and outer knobs. There is the Mic input, Headphone socket, Power on and off, and a shared button for Voice and Frequency Lock. The only other buttons to the left of the VFO are a block of four, controlling Mode, Band Width, Tuner, and Tuning Steps.
As previously mentioned, I engaged the menu setting allowing the Mode to be spoken when changed.
The Band Width button cycles through three previously defined widths, and is a nice feature also found on the more expensive Icoms.
I chose the 1 KHz Tuning Steps for the fast tuning button. This meant in normal use, one revolution of the VFO moved smoothly through about 1.5 KHz. When fast tuning was turned on, the tuning dial moved about 130 KHz per revolution. The microphone buttons allowed me to move easily to a round frequency, and subsequently by 1 KHz steps when in fast tuning mode. The Mic buttons moved by 50 Hz steps when in normal tuning mode.
To the right of the VFO is the numeric Keypad, with just above the keypad, three buttons controlling Noise Reduction, Noise Blanker, and Auto Notch. Below the Keypad are two further buttons for Attenuate/Pre-amp and Menu. There is a rotary outer knob controlling the Manual Notch and a Multi-purpose ‘ratchet’ inner knob for various uses, including scrolling through the menu.
I’ll go on to describe how Icom have very cleverly utilised so few controls, but there are two areas I feel could have been improved to make life easier for a blind operator. First, is the positioning of the Voice button. This is situated on the front panel and fairly close to the main VFO. It is at about 8 o’clock in relation to the main Tuning Dial. As the Tuning Dial sits almost flush to the front panel, it is very easy to accidentally touch, when attempting to check the frequency. Some of the other buttons are also close to the VFO, but I feel the very frequently pressed Voice button should be placed further away from the Tuning Dial. Somewhat compounding the problem , the frequency Lock is shared with the Voice button.
My second grumble with the layout, is the lack of separation around the numeric keypad. The three buttons for Noise Reduction, Noise Blanker, and Auto Notch are positioned above the 1, 2, and 3, of the numeric keypad. While they are slightly narrower and slightly offset, it would be more intuitive to have a separation of some kind. There is no pip on the 5 key, and I found myself locating the Enter key, bottom right, and counting buttons on the keypad from this known point. Not a major problem, but an area of the radio a blind operator will inevitably have to navigate many thousands of times over the course of its working life.
I was very interested to learn how Icom had implemented the use of very frequently used functions in the IC-7200. There didn’t seem to be enough dedicated controls, and I initially feared the menu would have to be used for even basic changes.
With the IC-7200, Icom have changed the notion of the numeric keypad being used as a three level stacking system for the bands. For example, on many other Icoms, pressing the 7 key would take you to the 15M band, where subsequent presses of the 7 key would cycle through 3 different frequencies and modes on 15M. The IC-7200 departs from this, and uses the numeric keys to control other functions. You can still get to a band directly by using a long press on the Enter key, followed by a number, but a momentary press of a number key will now control other functions.
For instance, press ‘7’ to turn compression on and off. Each press gives a beep, but unfortunately the beep tone does not differ to indicate on or off. In the case of compression, I would normally be looking for the Monitor button, so I could hear the changes through my headphones, indicating on or off. With the IC-7200, I was very pleased to find I could always reliably turn a function on by entering its set-up mode.
If the ‘7’ key is held in for about a second, the compression set-up mode is entered. You will hear a short beep followed by the longer beep, to let you know you’re in compression set-up mode. Now, this is the good part, because as I’ve mentioned, entering set-up mode, always turns the function on regardless of its previous state.
So, to guarantee Compression is turned on or off:
1. Hold the ‘7’ key until you hear a short and a longer beep. You are now in compression set-up mode, with Compression automatically turned on.
2. Momentarily press the ‘7’ key again. You’ll hear a short beep, and you’ll be back in normal operating mode, with compression still turned on.
3. Momentarily press ‘7’ again. You will hear another short beep and compression will be toggled off.
If you are sighted, and wondering what all the fuss is about. I can guarantee that some way down the line, a blind operator will forget if an option is on or off. Being able to determine this independently is crucial !
Fortunately this useful convention applies to almost every function controlled by numbers on the Keypad, and also the Noise Reduction and Noise Blanker. Hold the appropriate button in for a second, and then press again momentarily to guarantee always turning the function on.
If we actually want to change a function’s setting, simply hold the key until set-up mode is entered. Adjustments are then made by rotating the Tuning Dial. I found that one complete revolution equated to a setting of about 60%.
So, to change the Noise Reduction:
1. Hold the Noise Reduction button for a second, you will hear a short and longer beep and be in set-up mode.
2. Turn the Tuning Dial, and you will hear the decrease in noise levels.
3. Once you have found the best level for the QSO, press the button again, and you will return to normal operating mode, and know that Noise Reduction is turned on.
I found Split operating to be easy and intuitive to use. The ‘2’ on the Keypad, toggles between VFO A and VFO B. ‘3’ on the Keypad turns Split on and off, with a longer press operating A = B, and following the convention it automatically turns the function on. Once the XFC function has been enabled in the menu system, the RIT key will allow you to listen to your transmit frequency when held down. This can also be used to establish if Split is turned on.
Memory usage is not so straightforward. In theory, it is possible to use it successfully, but there seemed to be no way of easily getting to a Memory Chanel using the Keypad. I could only find a channel by turning the Multi purpose knob, and the channel number was only shown on the display, not spoken. If I wanted to access memory 44, I feel it would be essential the system either spoke the channel, or allowed me to enter ‘44’ on the Keypad.
I found output Power adjustment to be relatively easy. You hold the Menu button for about a second and hear a beep. Incidentally, holding it for a further second, would put you into the full Menu. So, holding until just the first beep is heard, puts you into a mini Menu with three options shown. These are Power, Mic Gain, and Data. You cycle through these options using the Multi-purpose knob. Very usefully, the Power option always beeps, so you know where you are in the mini menu. Adjustment to the Power is then made using the Tuning Dial.
So, the process for changing output Power is:
1. Press and hold the Menu button. A long beep is heard.
2. Turn the Multi-purpose knob until a beep is heard. You are now on the Power setting.
3. Turn the Tuning Dial. One revolution is about 60%. Turning clockwise several turns will get you to the 100 watts position, and additional clockwise turning has no effect.
A similar mini menu structure is used to adjust the various VOX parameters. Again, it is possible to make all the necessary adjustments independently, if you remember the fairly simple sequence, and can estimate the levels when turning the Tuning Dial.
In summary , the IC-7200 will voice the Frequency, Mode, and RX Signal Strength. This obviously limits menu access, but I found it was not necessary to visit the menu other than for initial set-up. There are minor issues with layout, and I think storing and retrieving frequencies in the Memory Channels would be a challenge for a blind user. Apart from these limitations, I found the IC-7200 to be very accessible. A blind operator will have to remember the layout and location of buttons, as they are not spoken, but frequently used functions are easy enough to use, and I was impressed with the keypad implementation.
Related Downloads
None
